
ShipOut-WMS user guide
Hello!Welcome to ShipOut. Before you officially operate the WMS system, I hope you have initialized the system:
Log in to WMS system website: https://wms.shipout.com/z/#/login
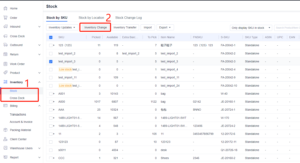
1) Basic settings: create SKUs (customer SKUs are created from OMS, warehouse SKUs are created from WMS), and set initial inventory (product inventory can be increased through receipt/return documents, or inventory can be manually adjusted);
Click the link to learn:
How to create a standalone product?
How to create bundled products?
2)Shipping account setting: if the system needs to print the logistics waybill, please link the shipping account in advance, open the required service and set the shipping automation;
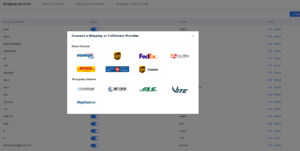
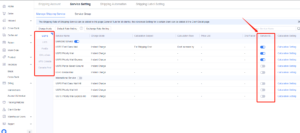
Click the link to learn:How to set up shipping services and automation rules?
3)Linking Selling Channels: Please link selling channels in advance if you need to update store orders to the system for processing; selling channel aliases mapping should be done after the selling channel is linked;
Click the link to learn:
How to connect ShipOut to your marketplace?
How to map store aliases?
4) Invite customers: To create OMS accounts for customers you need to invite or create OMS accounts in the customer center;
Click the link to learn: How to create/invite and manage customers?
5) Billing rule setting: billing rules shall be set in advance for OMS customers who need to be charged;
The system supports setting different billing plans for different customers;
Click the link to learn: How to set up billing rules?
6) Warehouse user management: warehouse users can be configured with system accounts to manage warehouses cooperatively. Warehouse user accounts with different roles can be created according to different labor divisions to intelligently manage warehouses;
Click the link to learn:
How to configure warehouse user accounts?
7) Warehouse Location: To enter the area division of the warehouse into system. When receiving products, the product will be put on the shelf to the specified warehouse location, so that the product location can be quickly located during the delivery;
Click the link to learn:
Product Inbound
1. OMS Inbound order Submission
If the warehouse receives self-owned goods or third-party products, the products would be un-packed and moved into storage for counting. ShipOut supports the creation a single inbound order and an inbound order for bulk imports. If multiple inbound orders exist, you can do an inbound batch import. The inbound order allows you to add different box types with one or more SKUs per box.
When sending an inbound request, please ensure to retain the relation between goods and boxes in the transportation process.
Note: Before making an inbound order, please make sure that the SKUs are already part of your Product module and approved by the WMS user.
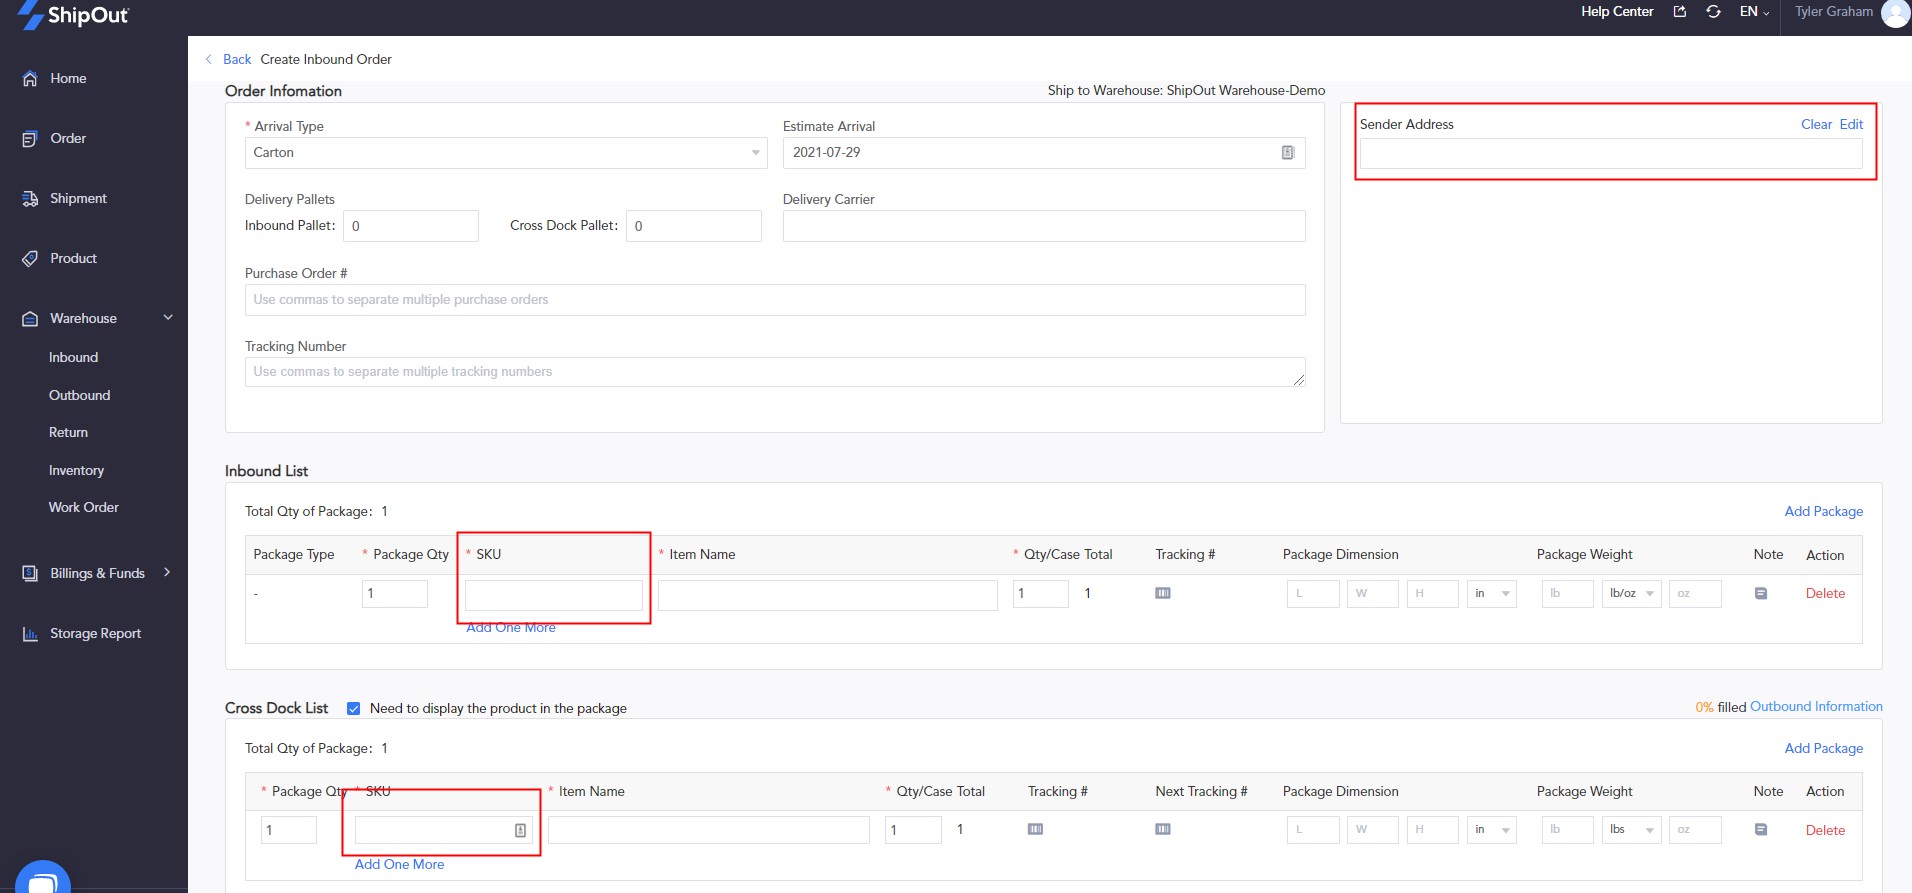
1.1 Manual creation of inbound order
Steps: Log in to OMS> Inbound> Create> Input information> Save.
If you have more than one type of carton in an inbound order, you can add the type of carton and fill in the quantity, as well as the number of SKUs for each type of carton.
Client Name: Select the corresponding customer;
Arrival Type:Contains carton, pallets, and containers of different sizes. For the warehouse, this is useful for setting different costs according to different types;
Fill in the estimated arrival time and shipping carrier;
Shipping Information: Select or edit shipping address & key in tracking number. If there are multiple packages, you can fill in multiple tracking numbers and separate it by commas;
1.2 Bulk import inbound order
If you need to send several inbound orders at a time, ShipOut supports batch inbound order uploading.
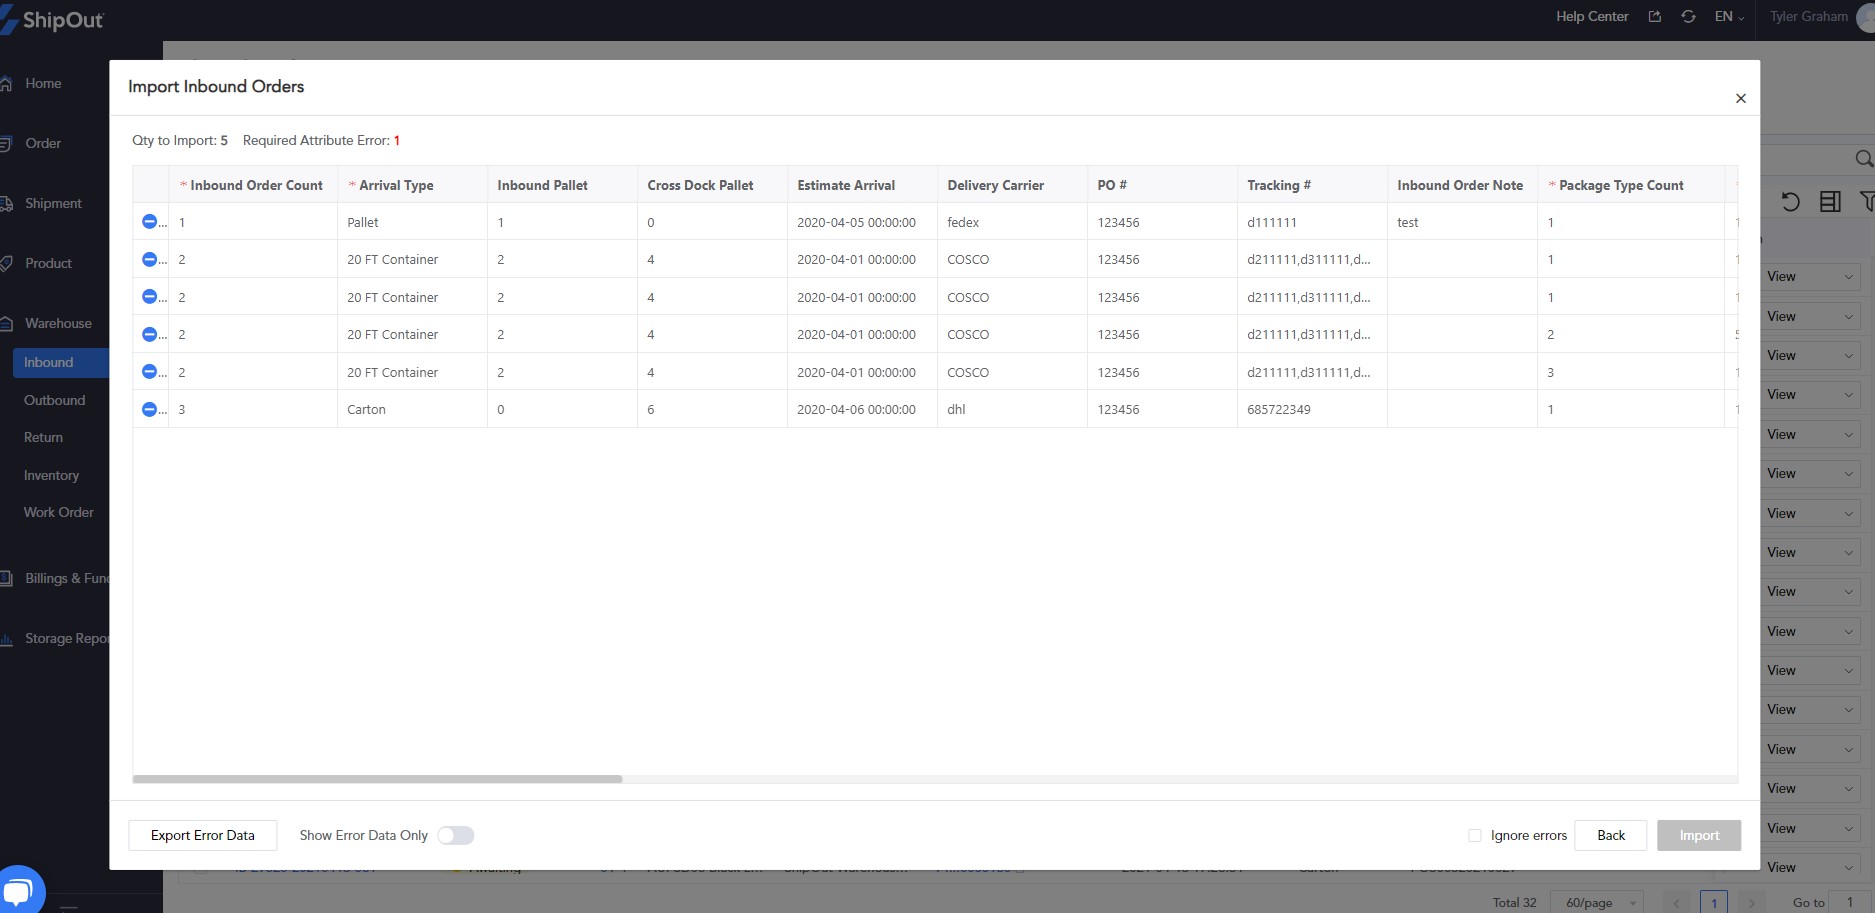
Steps:Inbound>Upload>Download template>Input your inbound information > Chose a file>Upload:Check imported information>Import>View>Commit to warehouse;
Note: In the exported template, the column headers in red are required to be filled out. Always make sure the data entered is in the correct format. The Arrival Type and Inbound Type are cells with drop-down menus that need to be filled in.
Problems can be checked and updated based on the colored column corresponding to the imported data column.
2. Receipt on WMS side
The WMS can receive the package by scanning the barcode or manually checking after the customer has successfully committed the inbound order.
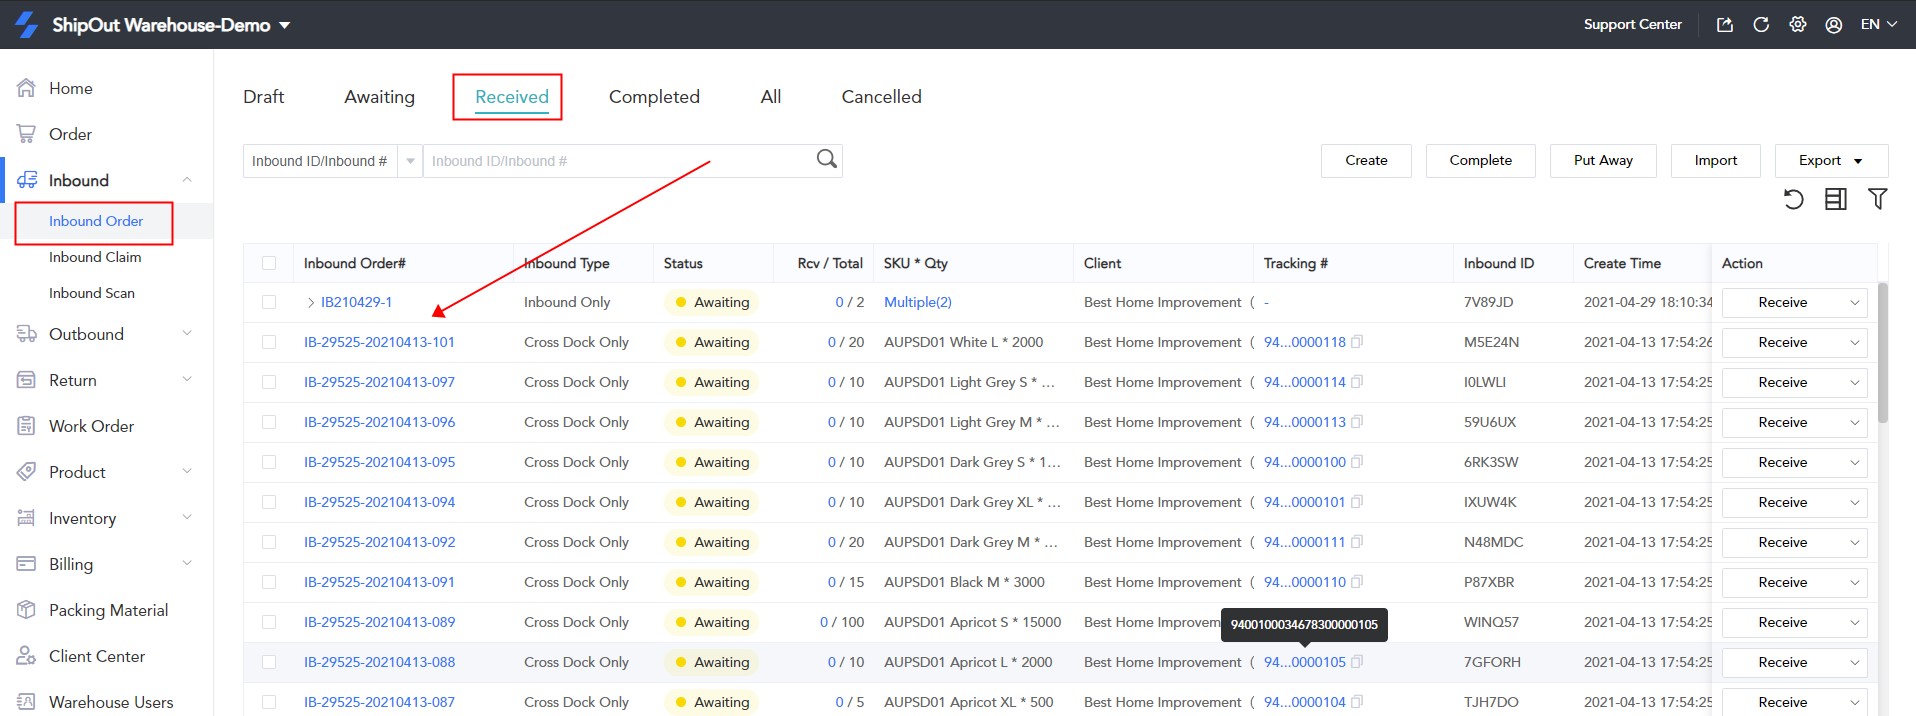
· If products received are greater or equal to items recorded in inbound order,click “Receive” then skip to “Received” tab;
· You may adjust the size and weight of the items according to the actual dimensions upon receipt;
· WMS users are only responsible for undamaged goods and items in good condition. If there are any damaged goods, photos can be taken and sent to the OMS client. Record the damaged quantity & standard quantity, and click “Receive”;
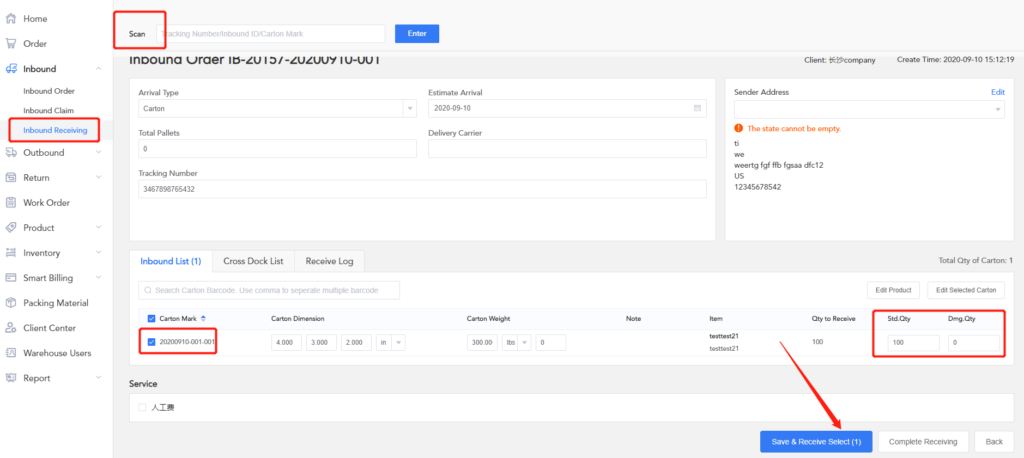
2.1 Inbound order Receipt by scanning barcode
Steps:Inbound>Inbound Receiving> Scan Carton Mark/Tracking Number/Inbound ID by barcode scanner or Shipout App,if Carton Mark/Tracking number exists already,the detialed information for current inbound order will dispaly,warehouse personnel shall fill in the receiving contents according to the number of boxes and the quantity of products received. If the quantity of the content collected this time is less than that of the application, you can fill in the current received quantity according to the actual situation, click “Receive” and wait for the next reception. If the current received content is equal to or greater than the applied quantity, enter the quantity and click “Receive” to indicate that the order has been received, and the actual received quantity is taken as the stock in inbound quantity.
Note:If the Inbound Type is Inbound, the product inventory in WMS warehouse will be changed once the products are updated as received, but there is no location information for these products at this time. If the Inbound Type is crossdock, the inventory in WMS warehouse will remain unchanged.
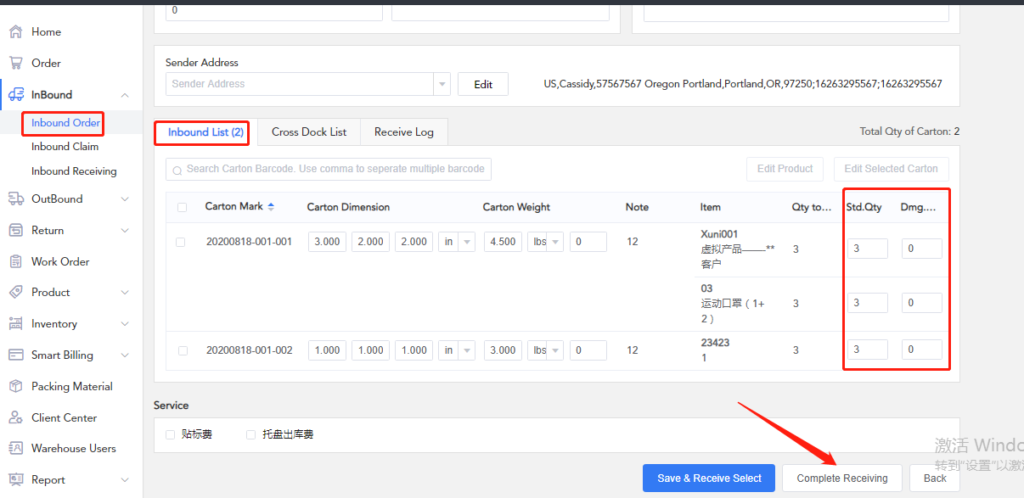
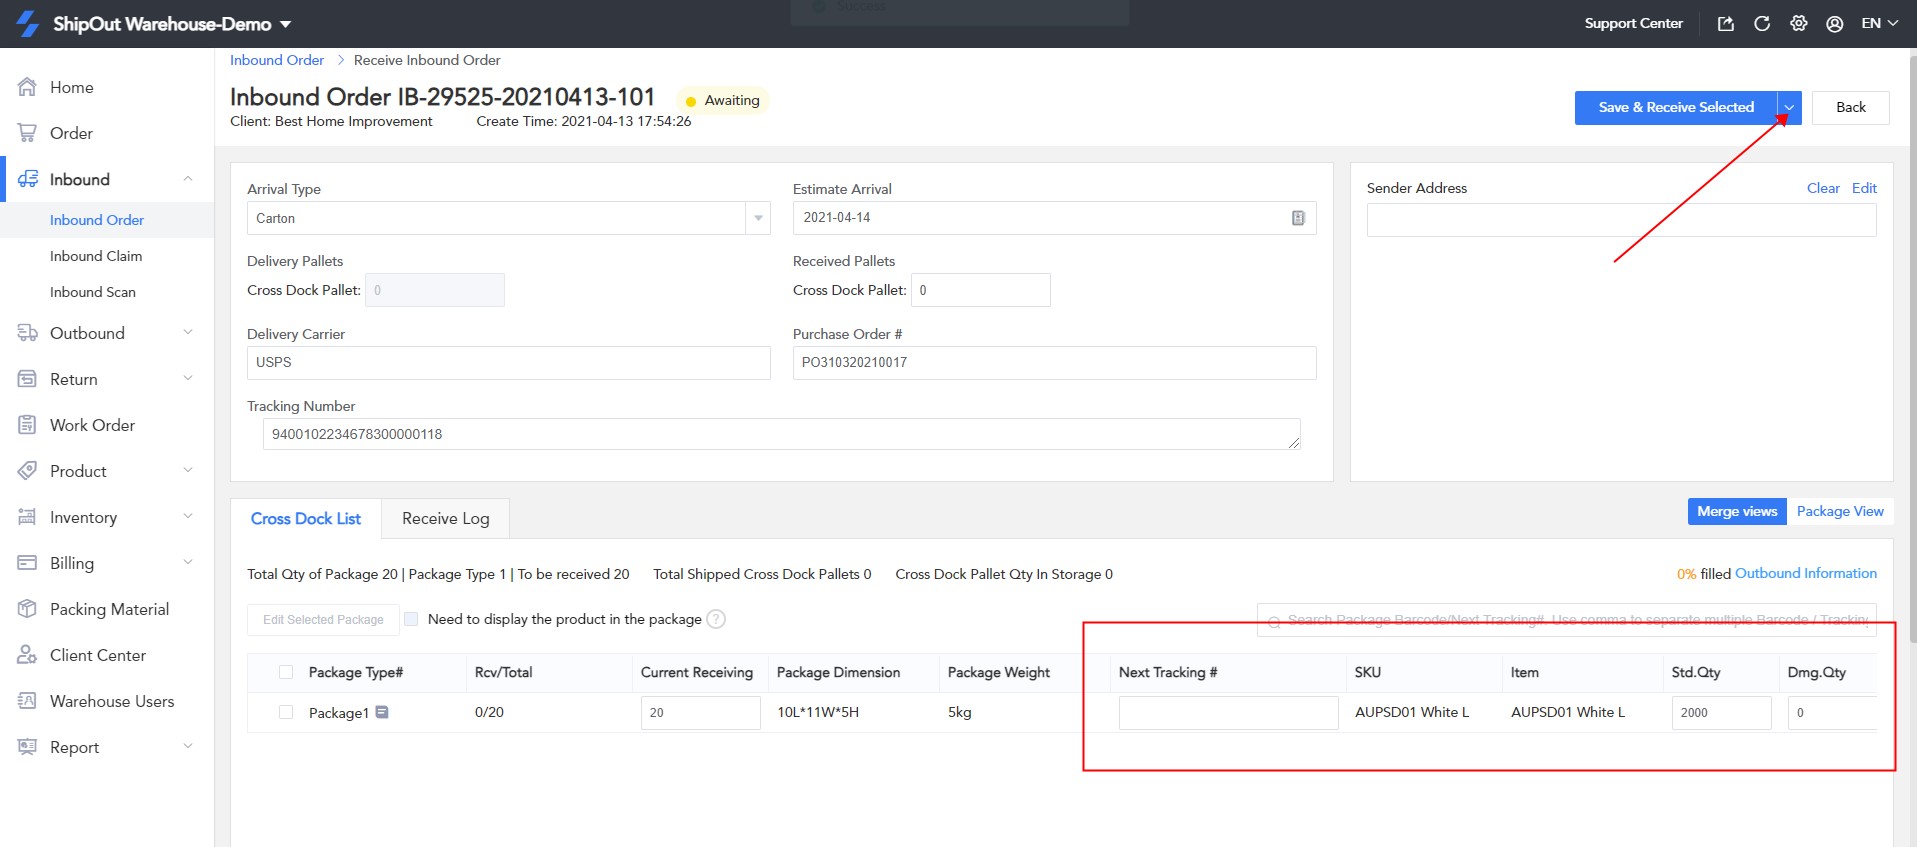
2.2 Receive inbound order manually
Steps:Inbound>View>Receive>Fill in Standard Qty, Damaged Qty, Dimension & Weight>Complete receiving.
· Received Qty> =Qty in Inbound order,click “Complete receiving”,order skip to “Received”;
· Carton Qty<Qty in Inbound order,Click “Confirm Receive”, order skip to “Partial received”;
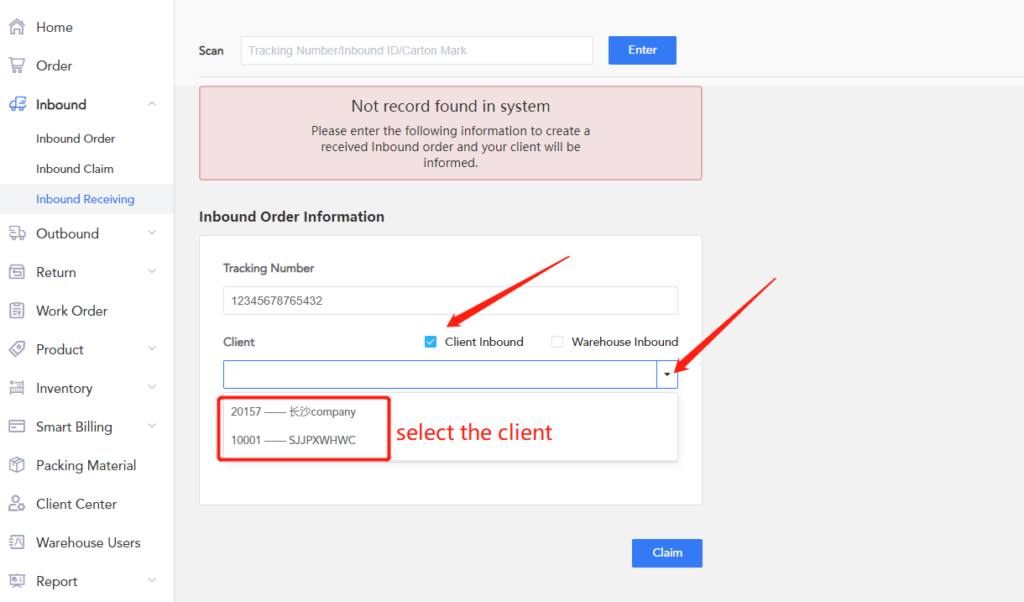
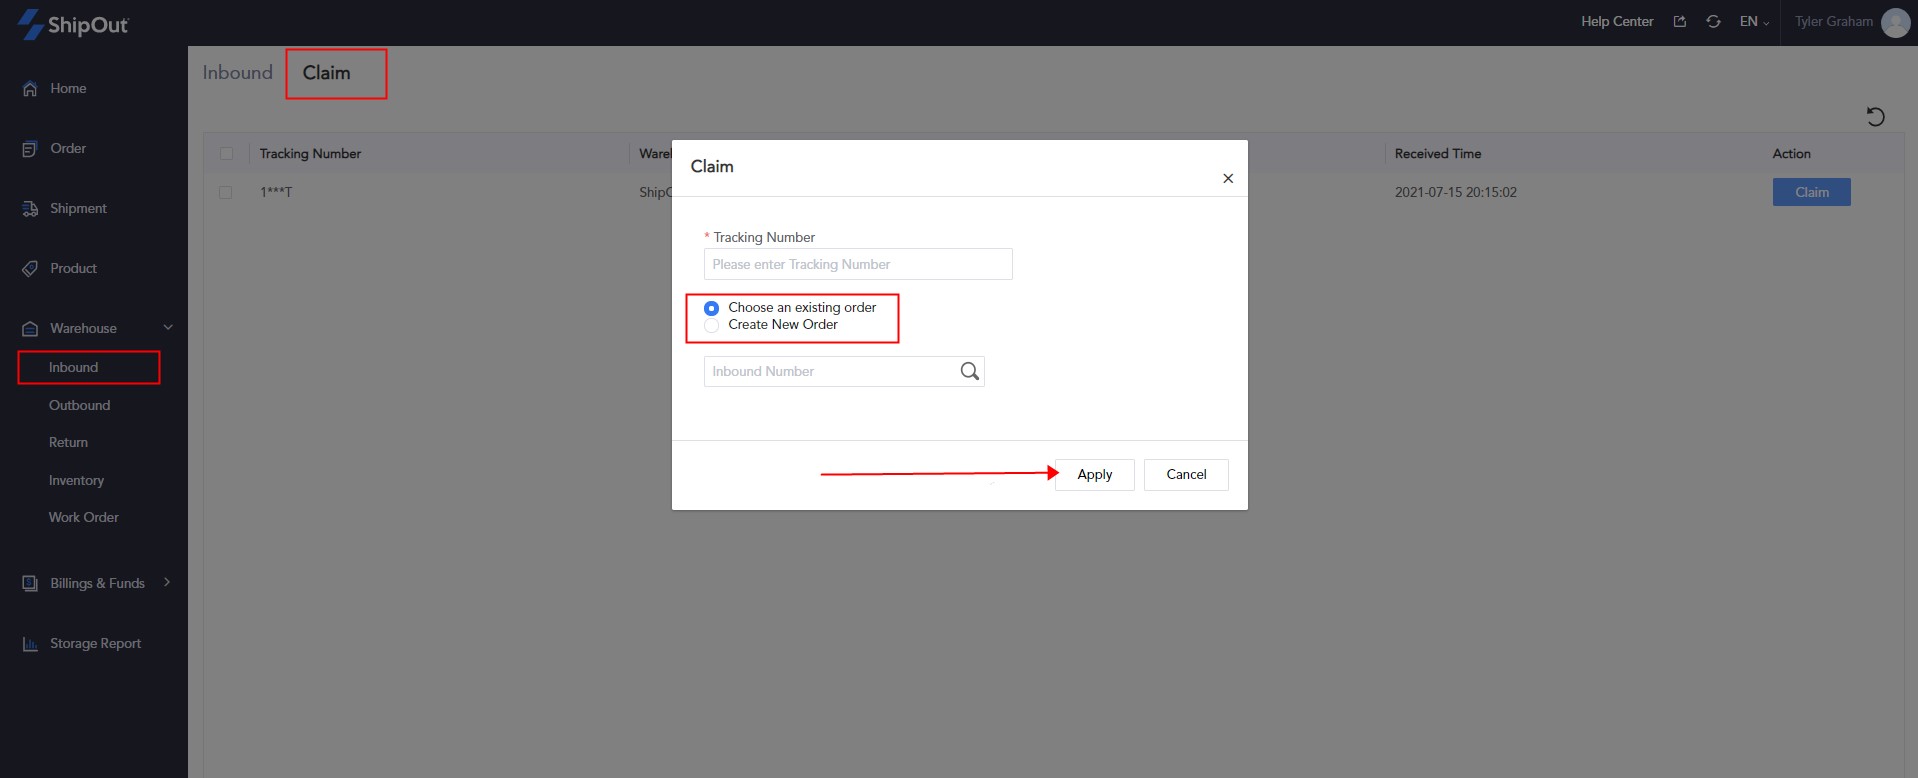
2.3 Claim:If the code scanning fails, it will enter the claim process
You may create a parcel claim with or without client information,
If the client ID of the current inbound parcel is known, tick “client inbound” and select the client ID and submit a claim, and the corresponding OMS client’s inbound claim page will have a claim record, and only that client will be able to see the claim information; if you are not sure of the client ID, select “warehouse inbound” and the claim is only visible to the warehouse;
The selected Client’s parcels will be displayed on Inbound, click the “Claim” button, and enter the full tracking number to claim the parcel.
If the inbound order for the parcel has been submitted, choose ‘Choose an existing order’ > Enter tracking number > Apply to match the current order. If you have not submitted a parcel inbound order, choose ‘Create new order’ > Apply >Skip to inbound order submission page > Submit inbound order related information;
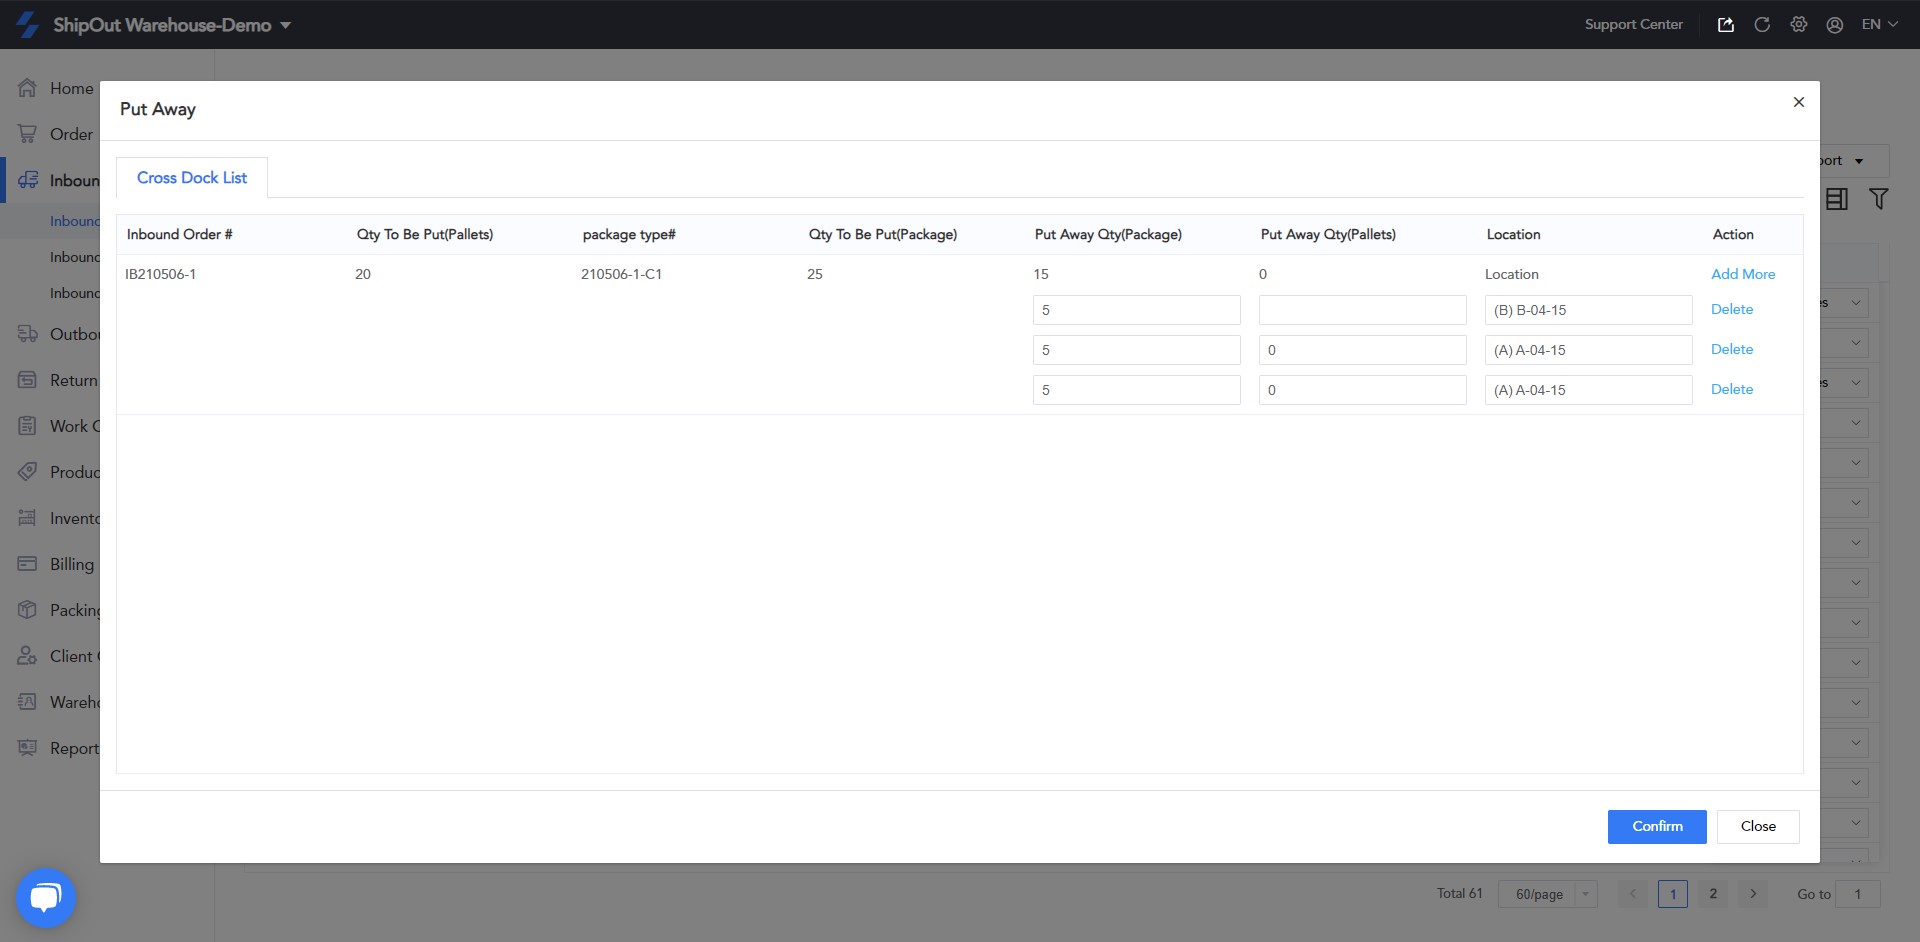
3. Storage of Goods
Once you have confirmed the receipt of the product in the inbound order, you can arrange the area and assign the location of storage for the product. Orders partially received can also be put away.
Note: Damaged goods of the Cross Dock inbound type do not need to be placed on shelves.
If the same product needs to be placed on different locations>add another location by clicking the plus sign “+” > Fill in needed information >Put away;
Note: The total quantity available for storage should not exceed the actual product quantity
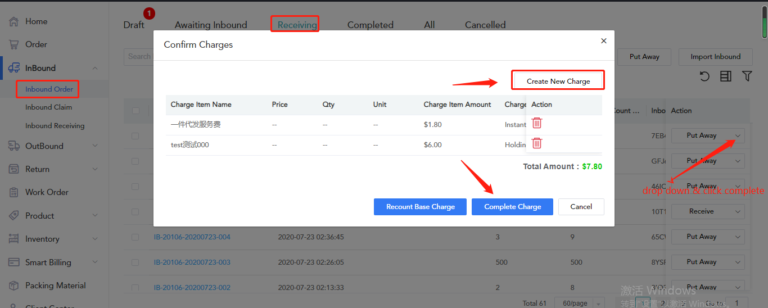
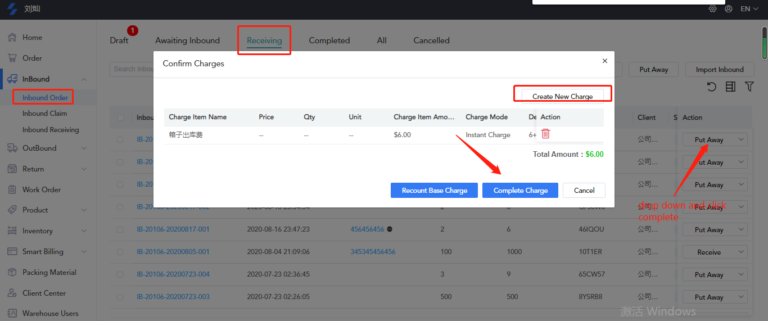
4. Confirming Charges
4.1 How to charge for an inbound order
If the inbound products are received and are already stored you can click “Complete,” which means that the order is completed and no further action is required.
Note: “Put Away and Receive” actions are not allowed after the inbound order has been tagged as completed.
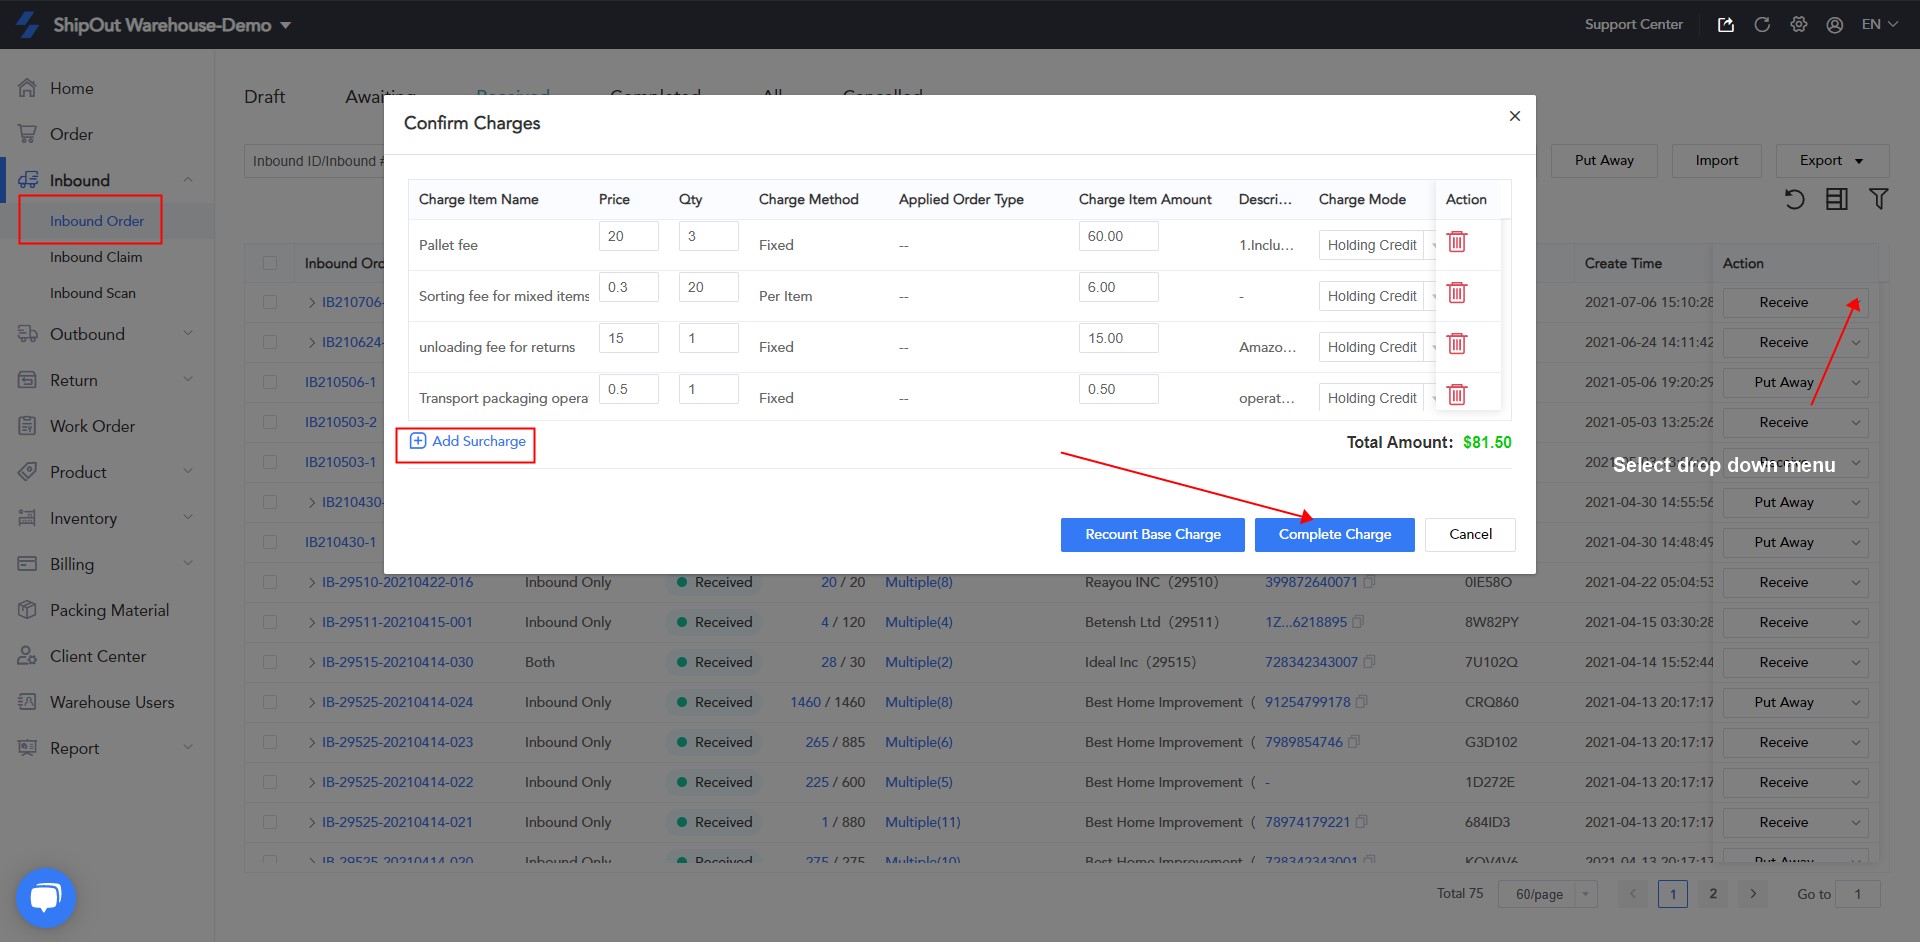
Steps: For inbound orders that have already been put away, click the drop-down menu under Action > Complete > Confirm Charge > Create New Charge if needed > Fill in related information > Complete charge.
After clicking the “Complete” button, the default inbound charge will be automatically included. The data for the default inbound charge can not be modified. You can delete or add additional surcharges as needed and click the recount base charge to reset the quality of the new charge added.
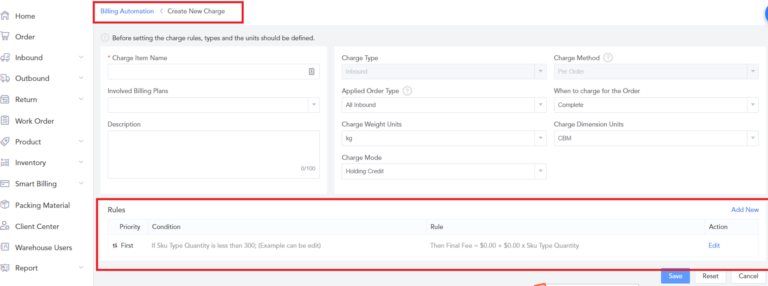
4.2 How to set billing rules for inbound orders
The WMS user may determine the applicable inbound charges in accordance with the service they provide.
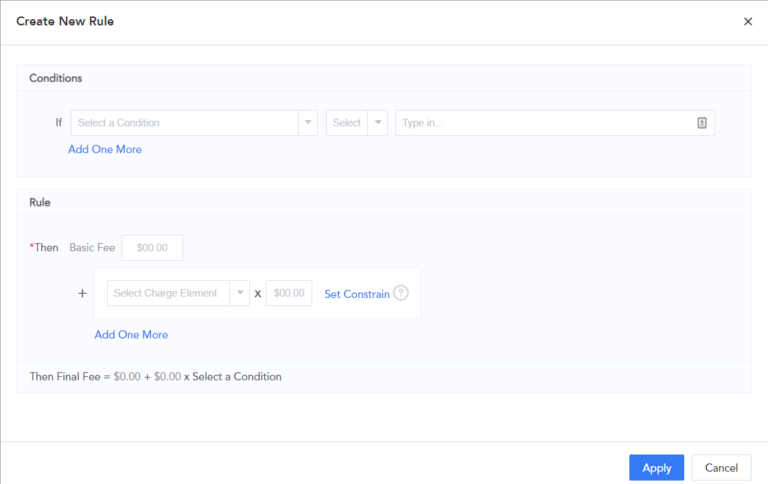
Steps: System Settings > Bill Automation > Inbound > Create > Skip to Create New Charge. Then, fill in the information you need. Click Next, the Rules section will be displayed. From here, click Add New > Create New Rule, and set the conditions and pricing rules for your warehouse.
Note: After the creation of the billing rules, the inbound order charges will be generated automatically. Typically the calculations are for each Inbound order / SKU / Carton / Contain / Pallet.
Cross-Dock
Cross-docking is a logistic procedure in which products from a supplier or a factory are distributed directly to another warehouse or FBA warehouse with no handling or storage time. The name ‘cross docking’ explains the process of receiving cartons through the inbound and then ship them outdirectly.
1. OMS Cross-Dock submission
Steps:Inbound>Create Inbound>fill in related information>Save. Unlike the Common Inbound Order, the transfer of virtual business requires the choice of the Inbound Type as Cross Dock instead of the Inbound.
The customer must fill in the Inbound tracking number of the transfer (from the warehouse of the WMS user to the destination) and the Shipping label of the transfer can be uploaded to the attachment.
2. Receiving inbound orders through WMS
After the OMS creates the Inbound Order and committed to the warehouse, the WMS user can then scan and receive or manually enter the tracking number or carton mark number.
3. Shipping
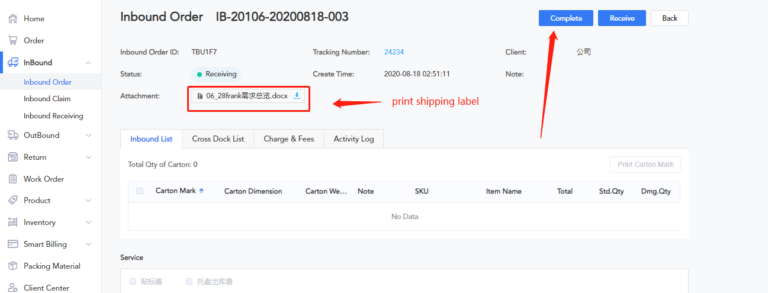
After the cross-dock order has completely arrived at the WMS warehouse, the WMS can print the shipping label supplied by the customer. And place it on the cartons that the customer wants to transfer and wait for the carriers to pick up.
Note: There is no need for items to be put away on shelves. You can mark the products according to the requirements of the customer upon receipt. Select Complete, signaling that the warehousing entry has been completed, and the system will then calculate the order completion charges.
4. Account settlement
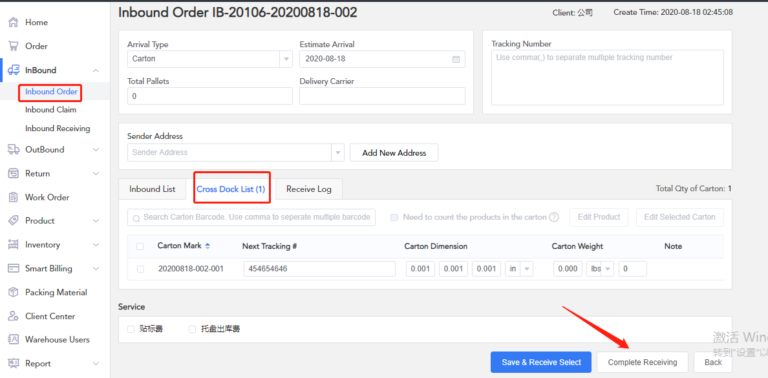
To tag an order as completed, go to the Receive Tab. Under the Action column, click on the Drop-down button and click Complete. You can also complete the order by clicking the Complete button on the order details page as shown below.
Once completed, the fee details will be generated, as shown in the figure below. Note: No Inbound is required for transshipment. You can set the standard fees by going to Settings > Billing Automation
Virtual warehouse
The big carton holds the small parcels when the carton arrived in warehouse, they are opened for shipment to their recipient. OMS users of the virtual warehouse do not need to create their own incoming documents, but they need to create a virtual product.
1. OMS submission
Steps:OMS create virtual products >WMS approve products >OMS delivery the products (Labels the parcel in the box to map the Shipping label)>Send the shipping label off-line >WMS receives product through inbound order >Confirm receipt and label for cross-dock >billing.
2. WMS receive and ship
When the Inbound order has been submitted by the WMS. The existing inbound order is received and processed, counting packages at the same time. They will then provide the shipping label and attach it to the corresponding package. Logistics will pick up the package to ship it.
3. Account Settlement
When the parcel has been picked up, Click Complete button in the Received Action Column to generate the fees.
Forwarding to FBA warehouse
Forwarding to FBA warehouse implies that the products that have been put into warehouse storage are sent to the FBA warehouse according to the requirements of the customer. The products need to be packed before delivery, and the customers need to send the Amazon label and carton mark to the warehouse, The warehouse will print and paste the Amazon label on.
FBA warehouse forwarding has two scenarios: inspection required and no inspection service needed.
1. Inspection required
OMS client creates products > Submit inbound order > attach Amazon label (not required for FBM orders) > Warehouse receiving Products > Warehouse confirming receipt in system and pasting Amazon label according to customer requirements ( Warehouse must print shipping label for FBM orders and send back the shipping information to OMS client) > Waiting to be collected By carrier > Billing
1.1 Inbound order submission
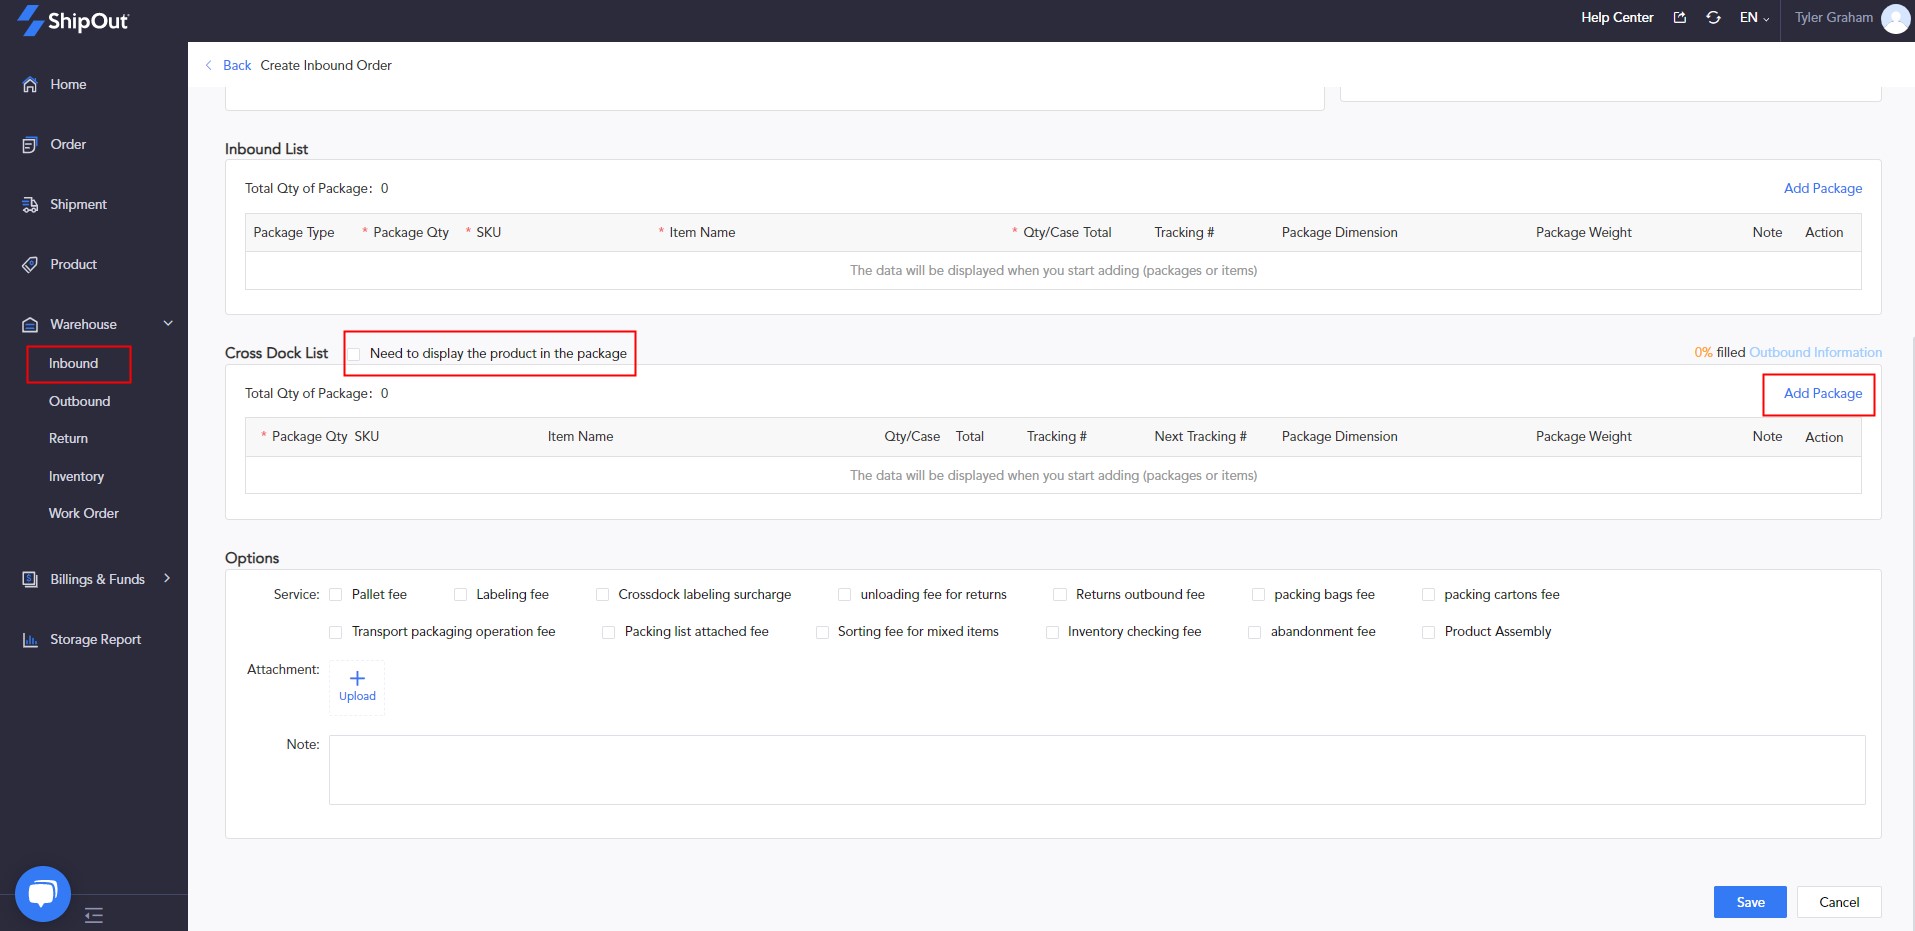
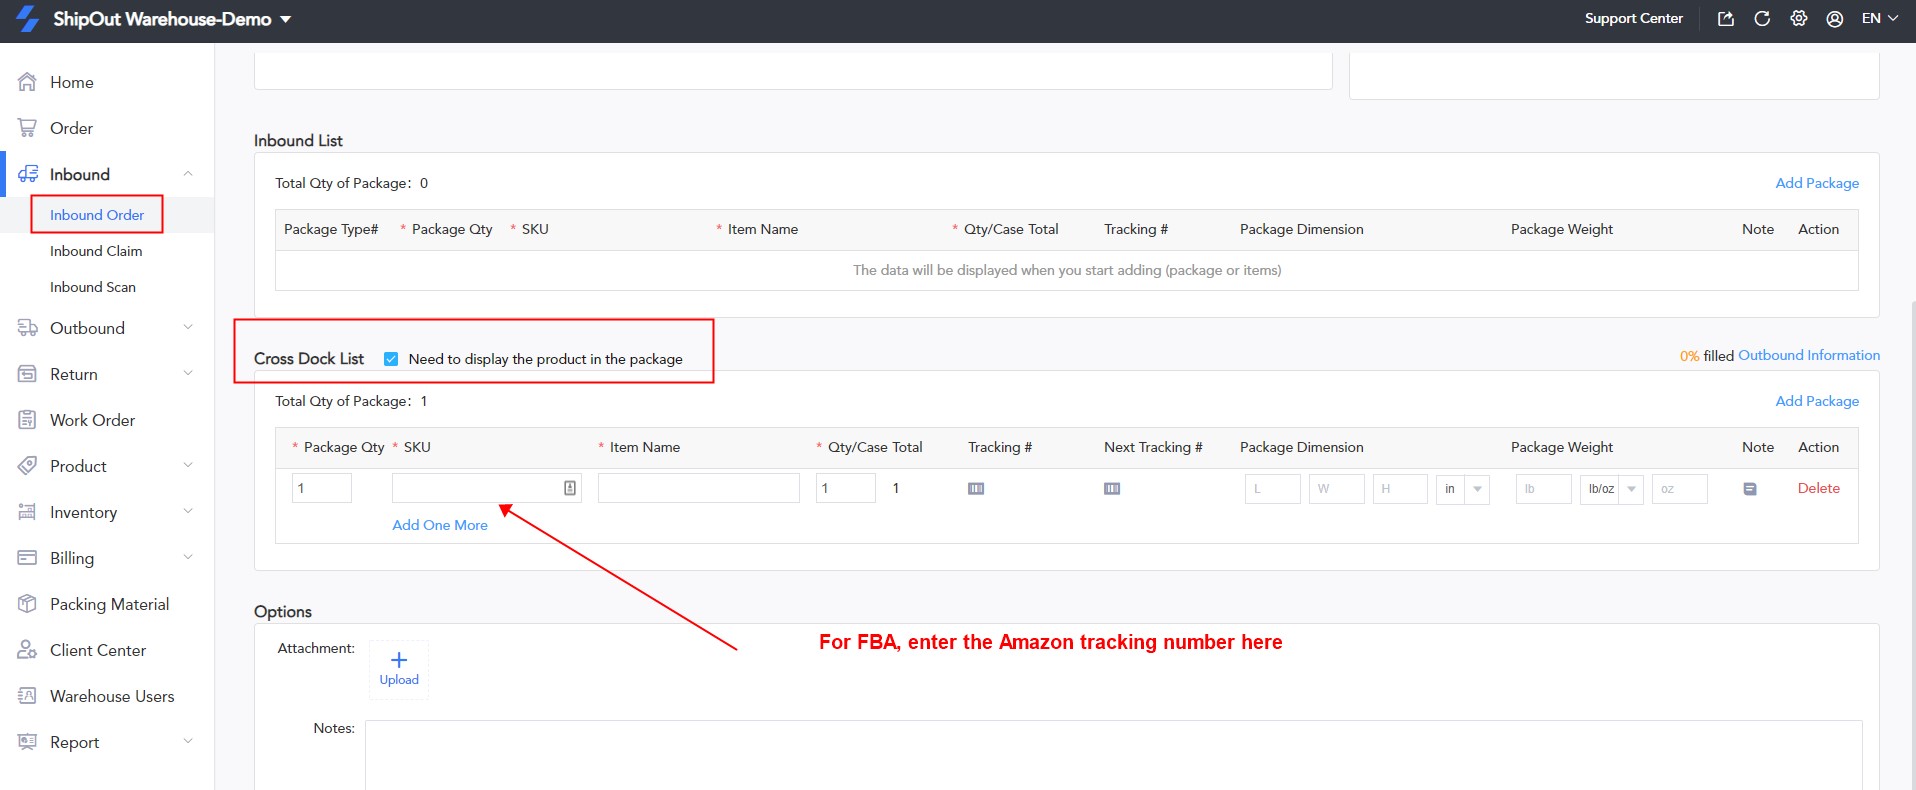
Steps: Inbound > create inbound order > fill in SKU information in the Cross Dock List section, enter all other necessary information > save. Input the tracking numbers provided by Amazon(which will be sent to the warehouse of the WMS user). For FBM a virtual number can be entered instead.
1.2 Receipt on WMS end
Find the order on Inbound > Inbound page,or by scanning bar code on Inbound > Inbound receiving. The items indicated on the inbound order can be inspected. You can confirm the order by selecting Complete Receiving, if everything is in order.
1.3 Shipment arrangement
For orders filled in by Amazon, the OMS client will need to send the Amazon shipping label offline to the WMS side. Once confirmed that the package is complete, the WMS warehouse can then attach the Amazon shipping label one by one.
For orders not filled in by Amazon, WMS warehouse needs to print shipping labels for OMS customers and attach them one by one. The tracking number needs to be sent back to OMS clients offline.
After labeling, just wait the carrier to collect the parcels and then click “Complete” on Inbound > Receiving page.
1.4 Account settlement
After the package is shipped by the carrier, the WMS warehouse can select “complete” in the action column under “Received” to complete the order and generate an expense list.
Note: There is no need for products to be placed in storage for FBA transfer. The associated charges are fixed in the inbound process. You can set the standard fees by going to Settings > Billing Automation
2.No inspection service required
OMS client creates a virtual product > send product > Provide Amazon shipping label offline (not required for FBM orders) > WMS warehouse receives product > WMS warehouse creates inbound order > WMS confirms receipt in system and attach Amazon shipping label according to customer’s requirements. If there is no Amazon shipping label provided, warehouse need to print shipping label for parcels and send back to OMS clients offline > Wait for package to be collected by carrier > Billing.
2.1 WMS inbound order submission
The Inbound order is submitted in behalf of OMS client by WMS user.
Steps: Inbound >Create inbound order> fill in the information > save.
Note: Do select “Client inbound” during inbound order submission and opt for the corresponding customer name.
The quantity of the carton is according to the number sent in the order by the OMS client. Multiple inbound orders can be submitted if the customer sends multiple packages (which can be through containers or pallets).
2.2 Confirm receiving by WMS user
Upon receipt of the inbound order, the WMS warehouse may confirm receipt of the current package as normal without inspection
2.3 Shipment arrangement
For parcels by FBA, OMS client will be required to forward Amazon shipping labels to WMS users offline. Once the products are confirmed received in system, WMS users can attach the labels on the corresponding package one by one.
For orders by FBM, WMS users need to print shipping labels for OMS client and attach them on package one by one, and tracking number needs to be sent back to OMS clients offline. Packages can then be picked up by the carrier and tagged completed once shipped.
2.4 Account settlement
After the package is taken away by the carrier, WMS users can select “Complete” in the action column under “Received” to complete the order and generate an expense list.
Note: There is no need for products to be placed in storage for FBA transfer. The associated charges are fixed in the inbound process. You can set the standard fees by going to Settings > Billing Automation
Parcel fulfillment
1.OMS outbound order submission
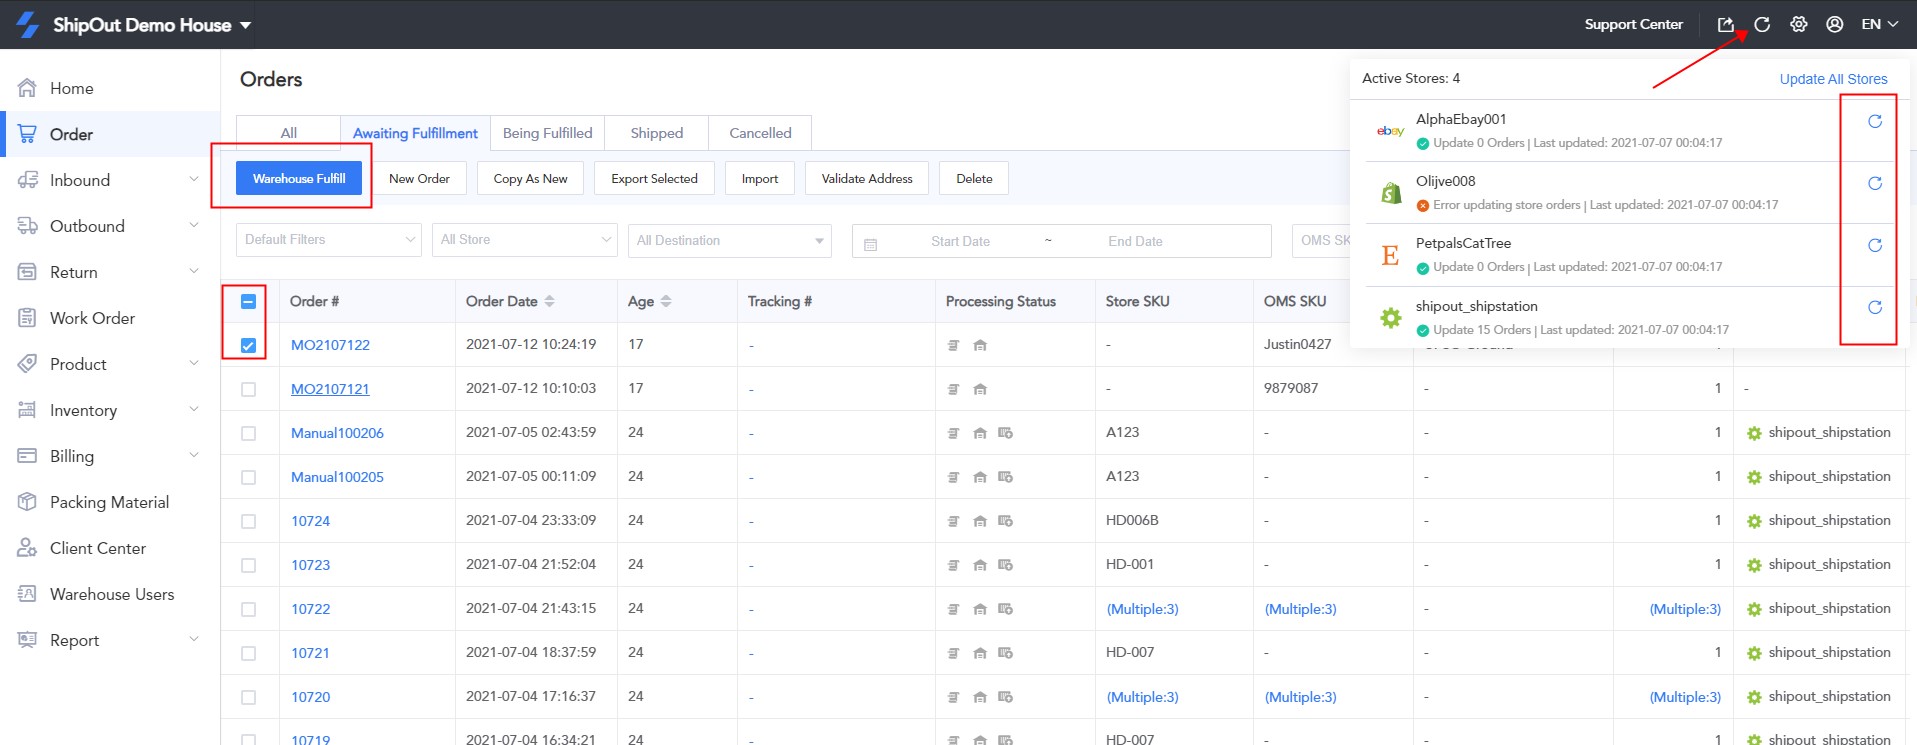
1.1Get Order from a single store
OMS and WMS can be connected to the store. After the connection, the order details of the store can be transferred to the outbound order management interface.
Login account > Order > Get Order dropdown > Select the name of the store > Tick the order to be shipped > Fulfill > Select warehouse and logistics services > Apply > After the declaration, the order will be entered in the WMS outbound management interface.
Note: The SKU of the order platform in the store shall be connected in advance to the Product Management Office and the SKU of the system.
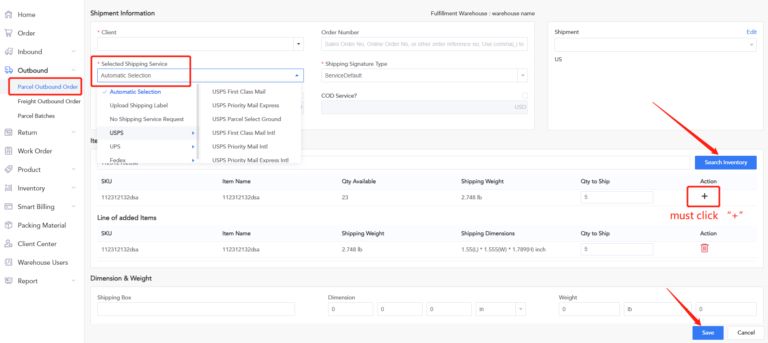
1.2 OMS and WMS can create a Single Outbound purchase order directly from the Outbound Management interface.
Login to account > Outbound > Parcel Outbound > Create outbound order > Fill in the necessary details as required > Select logistics provider with additional transport services (such as Shipping Signature Type, Insurance and Cash On Delivery) and other value-added services can be checked as needed. You may use the Remark field to Note other information > Save.
Note: Quantity to ship must be less than or equal to the Quantity Available.
Selected Shipping Service:
Automated Selection of Logistics Service by Warehouse
Upload Shipping Label – Customer makes and uploads the waybill to other platforms.
No Shipping Service Request.
You can also Add items, Edit or Add Package. See Below:
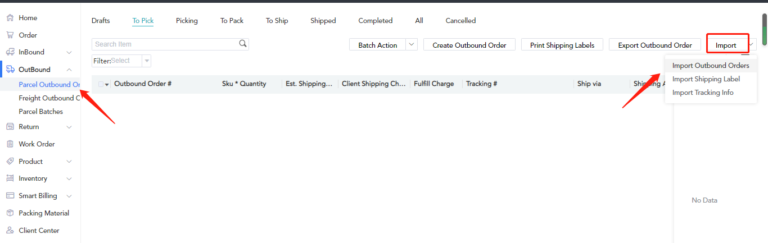
1.3 Batch Import Outbound Orders
Outbound may be imported by Excel Batch when large outbound volumes are included.
Steps: Login account > Outbound > Parcel Outbound Order > Import dropdown > Import outbound Orders >Download the Excel template for outbound orders >Fill in the information > The red font is mandatory information > Upload the completed form > Upload & Continue > Select Column Header > Start Import> Click Import.
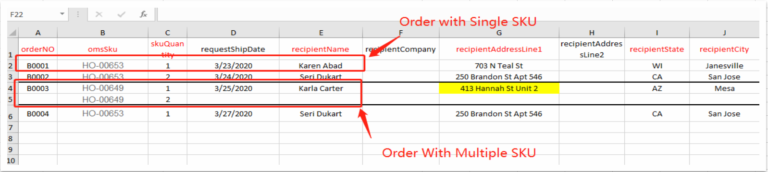
Note: When uploading several SKU’s for a single package, only one line of OMS SKU and SKU quantity should be provided, other information does not need to be filled in.
1.4 Estimate the outbound order’s shipping fee
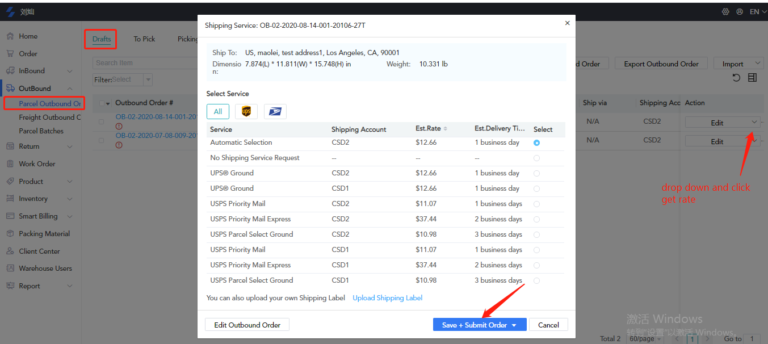
When the outbound order of the warehouse is saved but not submitted, it will go to the draft page, and the shipping fee can be determined on this page.
Steps: Outbound > Drafts > Under Action, click on the drop down> Select “Get Rate.” The outbound can be saved and submitted instantly after selecting the corresponding service, or the outbound can be submitted first.
2.To pick
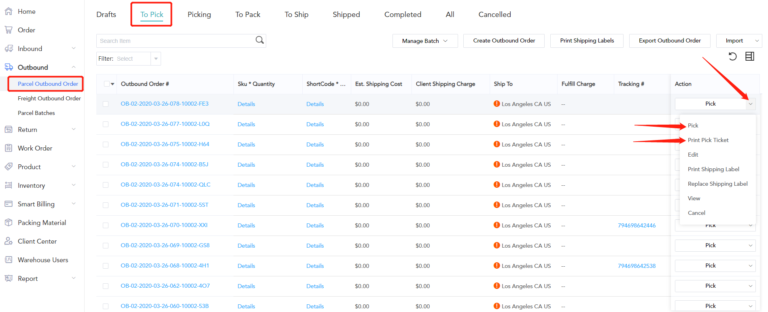
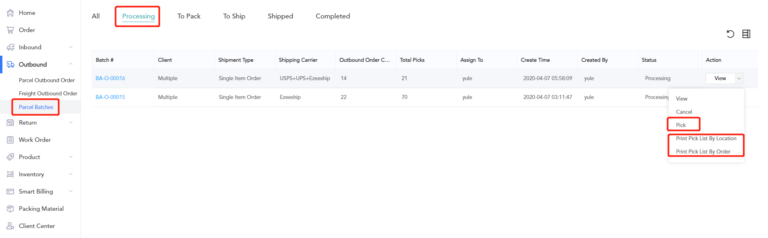
If the Outbound Order has been successfully committed by the OMS User, the order will show on the “To Pick” page on the WMS user’s side. They can print the “pick list” for their staff to begin the picking stage.
Steps: Outbound > Parcel outbound > To pick > Click the drop-down menu under Action > Print Pick ticket > Pick the products from corresponding location accordingly > Pick > Collate the quantity of the product selected and fill in the chart > confirm.
Note: This operation is designed for processing a Single Outbound Order.
If Multiple Outbound Orders are to be processed, it allows Multiple Orders to be selected on the “To Pick” page to create a batch, so that these Outbound orders can be easily Picked, Packed and Shipped in Batch. For additional information on this procedure, please refer to “How to Process Parcel Batch”.
3. To pack
After Picking, the Outbound Order will instantly be taken to “To Pack” status.
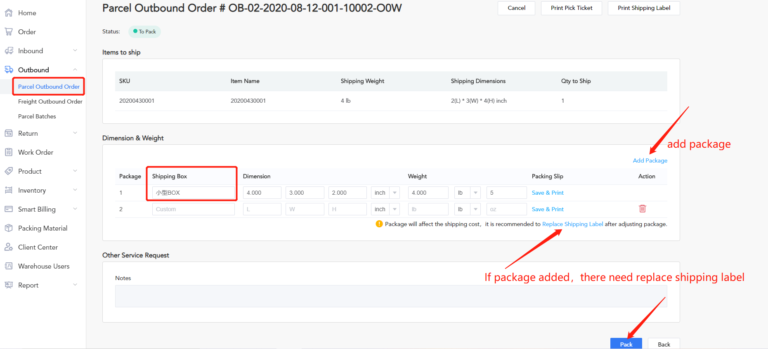
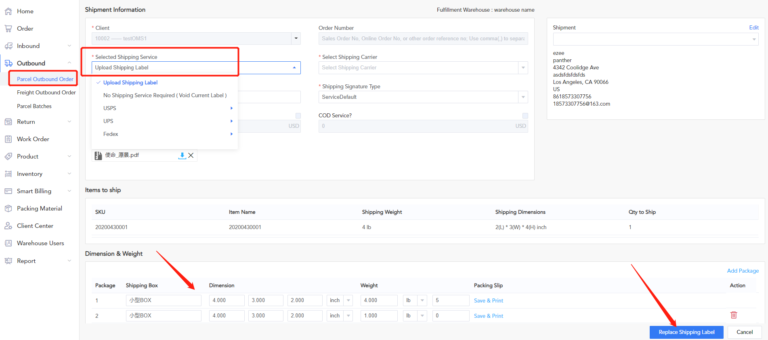
Steps: Outbound > Parcel Outbound Order > To Pack > Pack > Check the product type and quantity > Select the appropriate packaging material by scanning the code or manually > Print the Shipping label & enter details > Pack.
Note:
• If there is more than one outbound order package, you can “Add Package” for subcontracting packages and “Replace shipping label”. Click “Save and Print” to print the slip packing separately.
• To enter the editing status of the outbound order, click “Replace shipping label.” You may re-select the shipping service, modify the receiving address, and update size and weight of the package.
• When the new shipping label has been generated, the previously stored label will be cancelled automatically, and the shipping fee will be charged for the newly generated shipping label.
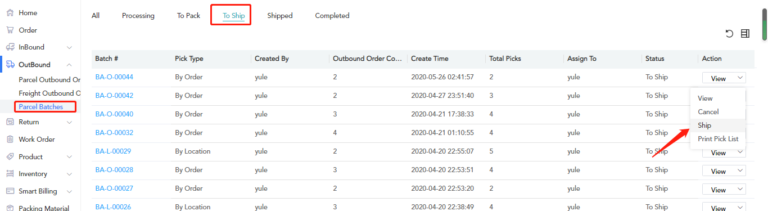
4. To ship
After packing, the Outbound Order would be moved to “To ship”. If this status needs a change in Shipping Service, Under Action click on the drop down> Replace Shipping Label > Print Shipping Label > Ship
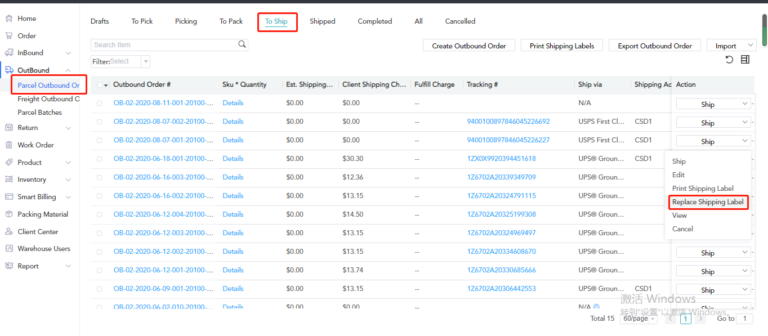
If nothing needs to be changed, Under Action click on the drop down > Select Ship. If the Outbound Order has been shipped, the tracking number cannot be changed.

Note: Shipping service, Shipping address, Package dimensions and Weight can be changed by clicking the “Replace Shipping Label”.
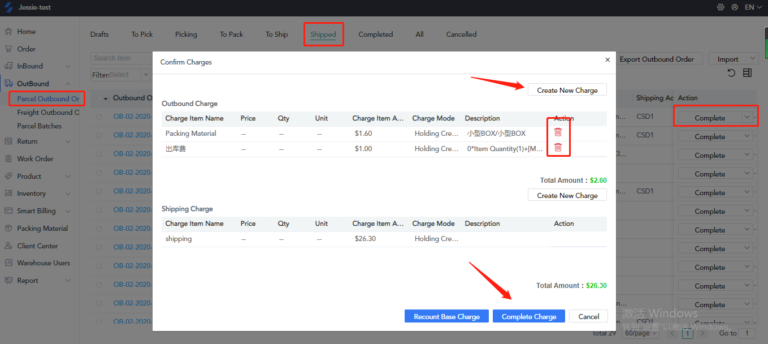
5.Account settlement
Steps: Outbound > Parcel outbound > Shipped > Complete, then the applicable costs will be displayed, just double-check the fees, and a new surcharge may also be added. Click on the “Complete Charge” to settle the cost, in this case, the entire Outbound process is Completed.
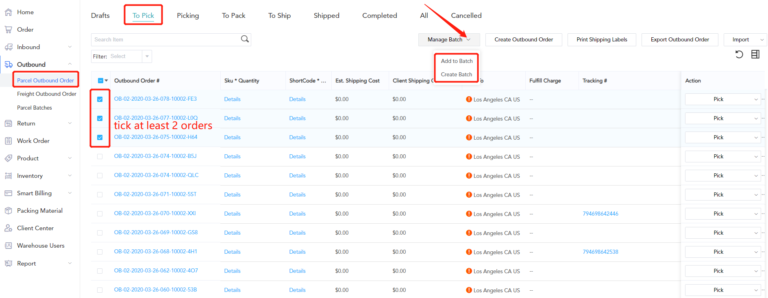
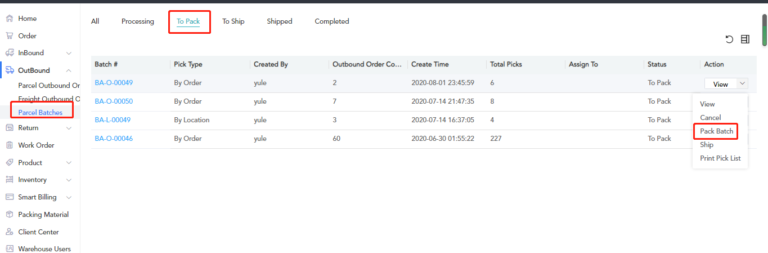
6.How to process parcel batch
ShipOut enables Batch processing of Outbound Orders: Batch Picking, Batch Packing, Batch Shipping, and so on.
Steps: Outbound > Parcel Outbound Order > To Pick > Batch action> Create batch by order / Create batch by location
Note: Create batch by order: if the warehouse locations of the products in this batch are similar and one or more products are included in the outbound order, the warehouse operator may choose to pick the products on a single outbound order basis; the location of the goods in each outbound order shall be displayed by order in batch on a pick-list of one by one.
Create batch by location: All single goods in the entire batch will be summarized and the pick list will be defined by location.
6.1 Create a batch outbound order
If the warehouse locations of the items in this batch are far apart, it is recommended to Create Batch by Location to save time.
6.2 Handle batch
Steps: Outbound > Parcel batches > View > Print pick list by location or order > Complete picking
6.2 Pack batch
After clicking on the “Complete Picking” button, it allows products to be added or canceled as seen in the following image. Once all the items under this batch are ready, press “Confirm,” the batch will be taken to “To pack” status.
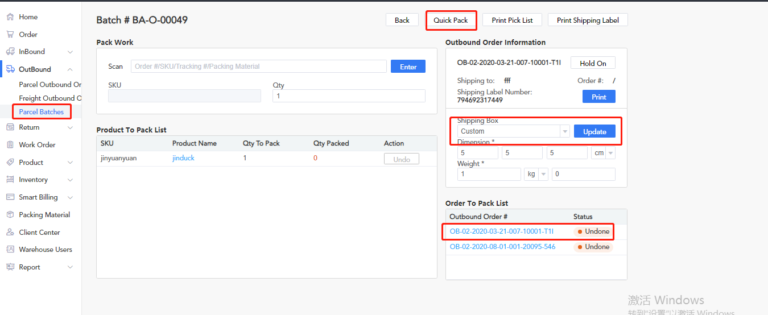
Enter the Pack Batch page, click the Outbound Order Number at the bottom right corner, and the SKU type and SKU quantity in the corresponding Outbound Order will be shown.
To ensure accuracy, it supports to pack orders with the use of a barcode scanner. When the scanned products are included in the batch, Quantity will be shown as “Qty packed”. When all products in a certain outbound order are ready, an “Outbound Order Pack Complete” pop – up message will appear. Click confirm, and the Shipping Label will be displayed.
Dimension & weight: Selecting the appropriate packing material size will automatically indicate the size of the package, and the determined weight will be the total weight of all products in one Outbound Order plus the weight of the packing materials.
If the scanned product is not in this batch, a “Cannot Match Orders” under this batch will be displayed.
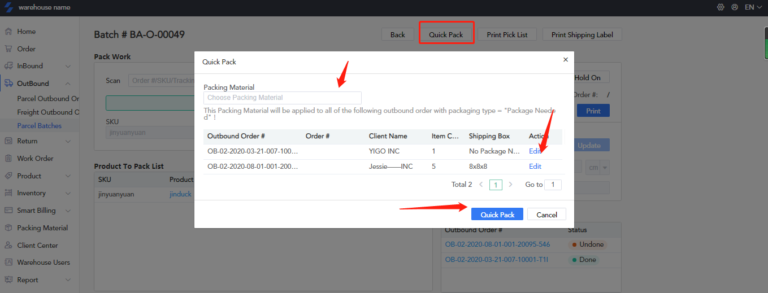
If you do not need to scan for packing, and the same packing material can be applied to all Outbound Orders in the same batch. Go to Pack Batch and tick “Quick Pack” select the packaging material at once and then confirm by clicking “Quick Pack”to finish the process.
Quick Pack:
Quick Pack:
6.4 Ship batch
Steps: Outbound > Parcel Batch > To ship > View > Ship
Prior to the confirmation of the shipping, the detailed cost of each outbound order in the current parcel batch could be viewed, modified, and canceled.
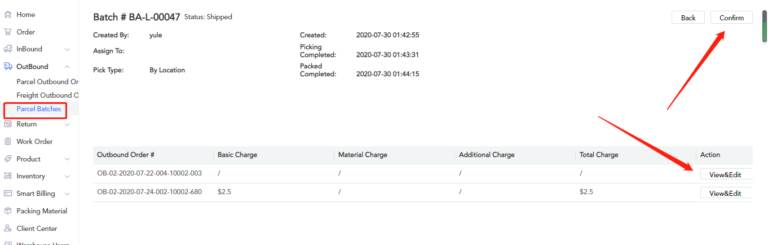
6.5 Complete batch
Once the Order has been shipped, enter the “Shipped” page to confirm the cost of this batch of orders.
Steps: Drop down menu > Complete > Check the charges > Confirm, if there is any modification needed, click “View and Edit” > Cancel or Add charges accordingly.
Return processing
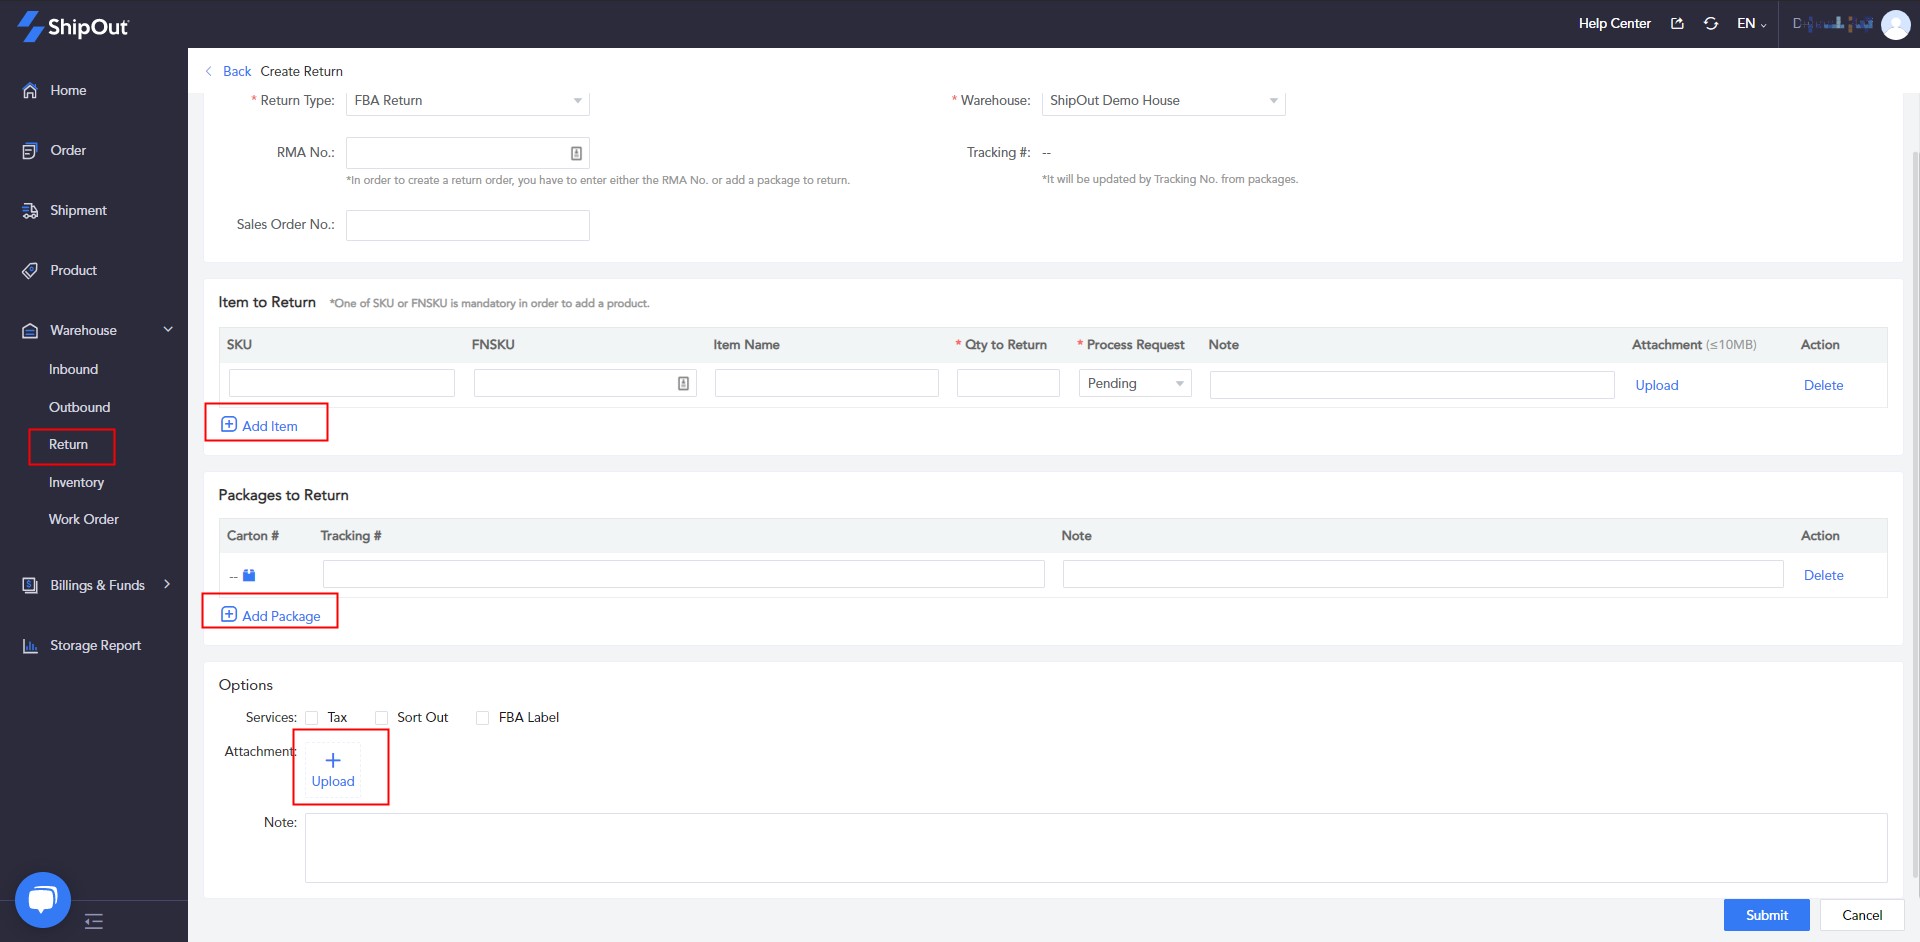
1.OMS side return order submission
Steps: Return > Create return > Choose Return type. Fill in tracking number and SKU. If the products are obtained, then choose “Received”> Choose the operating ways > If there are Additional Processing required then select the Appropriate Additional Cost > Save.
Note: If the items were returned with FBA, it was recommended that a single return order be submitted for one SKU, to prevent greater processing work in the warehouse. Since different SKUs were distributed in different Amazon Warehouses. If multiple packages are returned, fill in multiple waybill numbers separated by commas.
Common methods of managing returns are as follows:
• Pending – Not going to process and wait for the OMS side to provide instructions.
• Add to inventory – Second sale on shelves.
• Outbound – Receive the items and deliver them directly to another address.
• Destroy – Direct destruction process upon receipt of products
• Other – Other processing
2. Receiving and processing in WMS
Steps: WMS > Return > Return Receiving > Scan the tracking number / RMA number > fill in the size. Weight and actual quantity of the returned package > receiving / make corresponding operation.
Note: Return is a one-time process. The Receipt of the items should have the same data of the returned products.
It could be more processed if the products were shipped in batches and the products have not yet been fully received.
Partial Receive – The return may only be received by Create a Return Order.
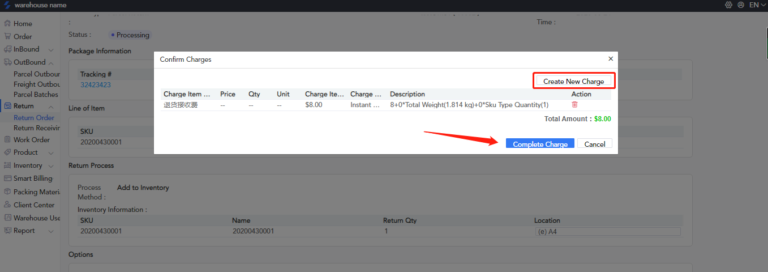
3. Account settlement
Steps: WMS > Return Module > To Process> Processing > Completed > Check the Return Billing. It could Create a New Billing Item > Completed the billing,
Notice: If the billing process is completed, the Billing Records are created in Smart Billing modules. The OMS side could also view this billing on the billing list.
Replace SKU label
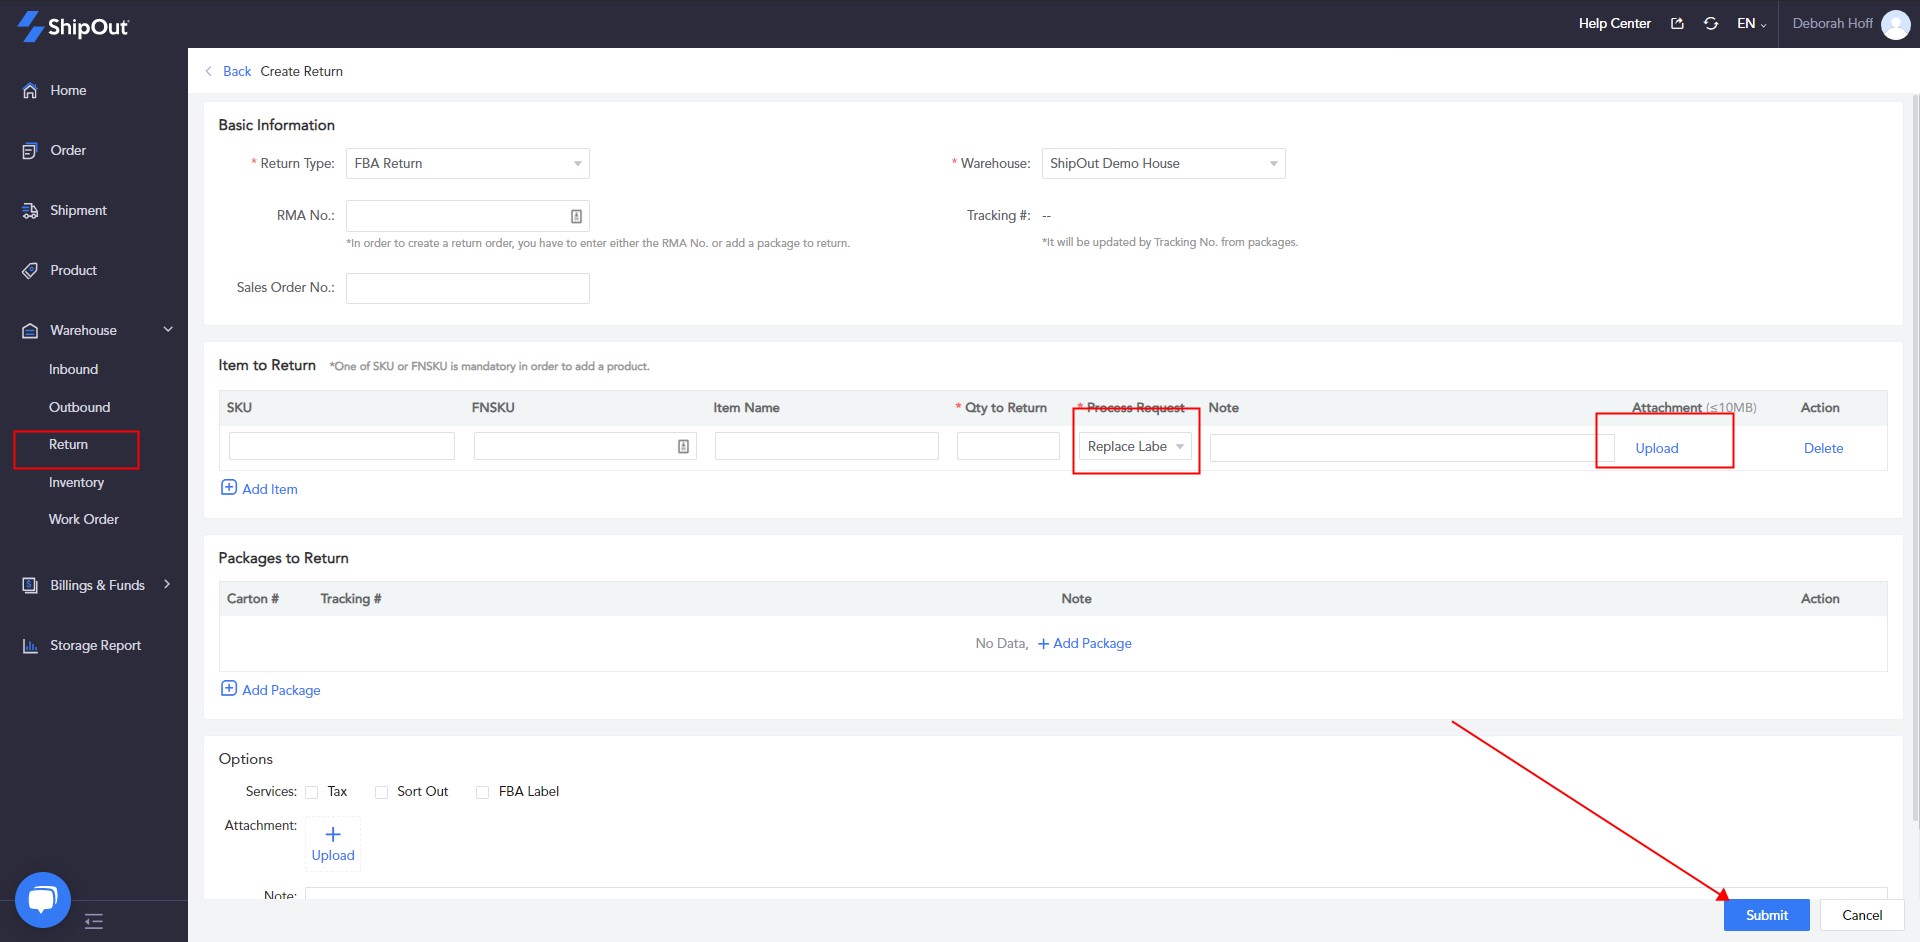
1.OMS submission
Steps: Return > Create return > Choose return type & fill in tracking number and SKU. > choose Replace SKU label as the process method> if appropriate additional services > save.
If the client chooses to replace the SKU label, the size and weight need to be indicated in the “Receiving page” once the item is received in the warehouse. Enter the information required, Upload the new SKU label > Save
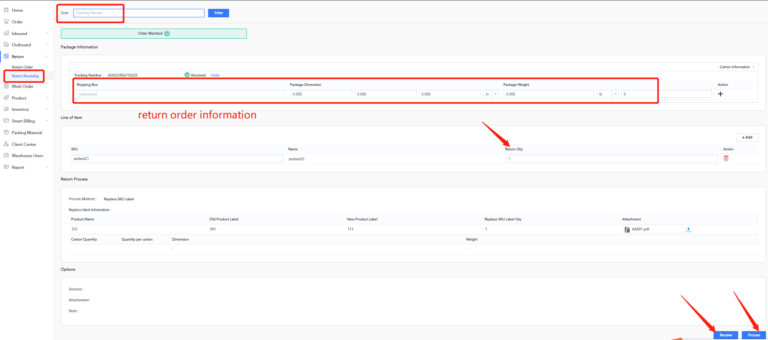
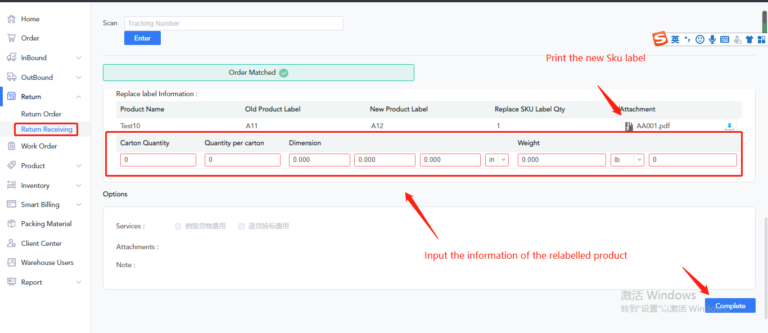
2. Receiving and processing in WMS
Steps:Return > Return Receiving > scan the tracking number / RMA number > input the size, weight, and quantity of the returned package >Click Receive or Process.
Note: If the product quantity did not match the return order, the status of the order will be “Partial Received”. You may notify the OMS client and wait for the missing items.


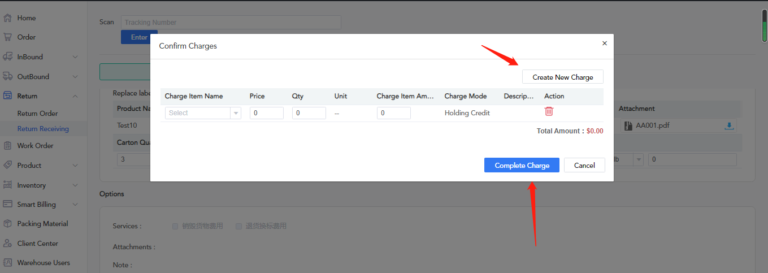
3. Account settlement
Steps:Return> Return Order> To Process> choose the order and click on the Process action button, Print the new SKU label and attach on the corresponding package/s> Complete> You may put additional charges, otherwise click on Complete Charge.
Notice: The associated charges are fixed in the Return process. You can set the standard fees by going to Settings > Billing Automation
Top-up and collection
(1) Recharge and review.
There are two recharging methods: online recharging and offline recharging. Currently, online recharging supports Stripe and PayPal. Only when WMS sets Stripe and PayPal accounts can OMS accounts recharge online; Offline recharging supports bank card, Alipay, WeChat and other methods. Customers can recharge to the corresponding account of WMS, and then submit recharge application to the system. After WMS reviews the recharge application, the amount will be the balance;
1. OMS accounts submit recharge
OMS customer submits recharge: fund bill – warehouse account – drop-down “recharge” – select warehouse – fill in recharge amount, recharge confirmation code, and recharge account number – submit;
Click the link to learn process of OMS recharge:
How do I add money to an OMS user’s account in WMS?
WMS can also recharge OMS in the system. For details, please refer to:
2. WMS review recharge
There are two ways to review OMS recharge:
Step 1: The icon in the upper right corner of the system>Account Settings>Payment Records>Recharge Review>Find Unapproved Records>Click OK>Confirm that the applied amount is consistent>Approve;
Step 2: warehouse homepage>click customer recharge notice>find unapproved records>click confirm>confirm that the applied amount is consistent>approve.
Click the link to get the detailed process of reviewing OMS recharge:
(2) Bill verification
In the billing cycle agreed between WMS and OMS, WMS can write off the issued bills only after generating bills from the transaction flow of the same OMS customer in this period.
1. WMS generates bills and writes them off
Step: WMS Bill>Account&Bill/Transaction Flow>Generate Bill.
Click the link to get the detailed process of generating and writing off bills:
How to generate and write off bills?
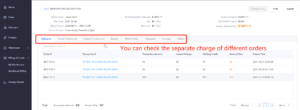
Each customer generates a separate bill, and the closing time is filled in according to the bill date to be written off for the actual bill. The generated bill can be viewed on the “Account&Bill” page. It supports printing and exporting bills.
2. OMS View Bill Write off
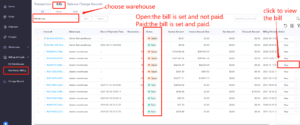
Step: Fund&Bill>Warehouse Bill>Bill>Select Warehouse>View

You have read the ShipOut WMS Business Module Operation Manual. Our manual will be updated gradually with the system upgrade. If you have any other suggestions or questions, please feel free to contact our CSM members.
ShipOut CSM Contact:
Tel:
+(+1) 901 213 8896 (US office)
+(0731) 85502091 (China Office)
Email:
hello@shipout.com