
ShipOut-OMS user guide
(1) Manually create an standalone product:
Step: Products> New Products> New stand-alone product> Check the warehouse/s where you want these products to show> Fill in all necessary information, All fields with a red * are required. Also, you can set the Low Inventory Alert Threshold
If the product is sold in an online store, you need to associate the store platform alias in the “Alias” section> then Submit; if there is an international shipping requirement, you must fill in the information required for customs declaration in the International Shipping Options”
Note: The Amazon store alias is ASIN, eBay store alias is SKU platform. If you are not sure, you can test the order in the “Order Management” interface after linking the store and check the SKU store information to determine (see Figure 4 below);


(2) Bundled Product
A bundled product is a product set composed of multiple item quantity of one SKU or several different standalone SKU, for example, a skincare product set.
Before creating a bundled product, the SKUs of the bundled product must already exist in the system, so please add a single product before adding a combined product. “Automation Inventory Conversion” needs to be turned on if you need to convert inventory from a Single SKU product to a Bundled product inventory.

Step: Products> New Products> New stand-alone product> Check the warehouse/s where you want these products to show> Fill in all necessary information, All fields with a red * are required. Also, you can set the Low Inventory Alert Threshold
If the product is sold in an online store, you need to associate the store platform alias in the “Alias” section> then Submit;
If there is an international shipping requirement, you must fill in the information required for customs declaration in the International Shipping Options”

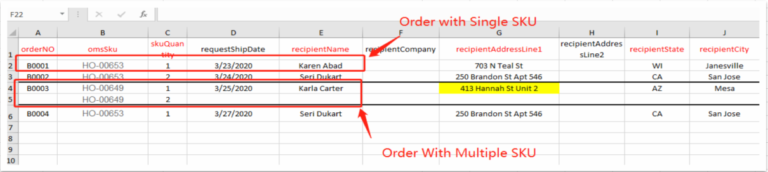
Steps: Product> Import > Import Standalone product> Select warehouse> Download form template> Fill in form> Select filled form> Upload> Confirm information> Import.

Template rules:
1) Column headings in red are required. Other necessary information should be provided if possible.
2) Item Package Type – If you do not need other materials for packaging, select “Ready to Ship”, and if you need additional packaging materials select “Package Needed”.
3)Qty In One Package: There can be several products in each package;
Hazardous (Battery) – if it includes hazardous items, such as batteries.
4)Weight 1 and Weight 2 – if weight is in kilograms, Weight 1 is for kg, then Weight 2 should be 0. If unit weight is lbs., Weight 1 is for pounds and Weight 2 is for ounce.

Import and update existing data: refers to products that update existing data
Import and create new records: Import new product records
Ignored, Irregular or missing data name – Invalid column, missing or invalid product name.
Ignored, mapping failed – Invalid column, inconsistent product size or weight unit Invalid line, duplicate data-name disregarded, duplicate data name

Batch Associate Store SKU
For multiple SKUs, you need to associate the store SKUs with the system ‘OmsSku’in batches to match the store order information. It is recommended that SKUs be done in batch association.
Steps: Product> Import dropdown> Import Selling Channels Alias> Download Template> Fill out form> Upload > Confirm Import information> Import> Fill in the template.
There are three fields required:
OmsSku – SKU code set by this system.
Store Sku – store SKU code, if different SKU stores have different SKU, then add a line of information.;
Store Name – the name of the store. The name of the store in reference to the SKU.

- Modify product information: After creating or importing the product, before WMS review, you can edit the product again: pull down to view>Edit>Modify product information>Submit; Note: The product cannot be modified after WMS review;
- Print the SKU barcode of the product: pull down to view>Print SKU barcode;
- Batch operation: check the product item> click “batch operation” to batch “archive” and batch “delete” products; note: all documents
- Export product: Product>Export>Export independent product, all product lists can be exported;

Steps: Inbound> Create> Select Warehouse> Fill in necessary information> Save> Submit and the record will show under Draft on the WMS.
Delivery method – Refers to the type of packing. Commonly there are boxes, pallets, and containers of various sizes. It is useful for warehouse to set different fees according to different packing type
Logistics details – Fill in the shipping address details. Common address information can be set in advance in Settings> Warehouse Settings> Address Book.
Tracking numbers – It is convenient to estimate the time of arrival and confirm the order number. When there are multiple packages you can fill in multiple Tracking Numbers, separated by comma
Box type – The same type of box is the same if the SKU and the quantity are the same. If there are several types of cartons in the warehousing list, you can add a carton type and fill the quantity of each carton type and quantity of the SKU in it.
ShipOut allows the creation of orders in two ways: manual creation of single inbound orders and batch import inbound orders.

Steps: Inbound> Import Inbound> Select Warehouse > Download Template > Fill in Template > Select the Form that you entered in > Upload: Review Information > Import > Submit the order to the warehouse in draft page.

Fill in the rules:
1) Columns with red headings from the downloaded templates are required and correct formatting must be followed. To avoid issues, please refer to the instructions in the template.
2) Inbound Order Count – Used to identify the number of the inbound order, each inbound order has a serial number, just type in 1, 2, or 3.;
3) Arrival Type – Used to indicate the type of transport to the warehouse (box, pallet or container) which is limited to the options in the drop-down menu.;
4) Inbound Tracking number – The tracking number sent to the warehouse is based on the package or, if the inbound record of each package needs to be tracked. The tracking number of each box needs to be indicated.
If the items to be obtained are palletized, or each box does not have an individual tracking number, simply put in the master tracking number or the BOL number. However, the carton mark of each shipment must be attached to the outer package or placed inside the box, so that the warehouse can scan and receive the box.
5) Carton Type Count – used to differentiate the types of boxes in the warehousing list. Whenever the same SKU is placed and the quantity of the SKU is the same, it is considered as 1 carton type.
6) Carton Quantity –the number of boxes belonging to the ‘same’ box type in the inbound order.
7) Inbound Type – indicates if the type of carton is a standard inbound or cross dock type. Cartons with a crossdock inbound type will not be assigned to a location and will not be added to inventory;
8) OmsSku – it is the SKU in the box, each box can contain multiple SKUs.
9) Quantity Per Case – the number of products per box.;

1.3 Printing Box Label
If there are multiple pieces of one ticket, in order to make it easier for the warehouse to scan each box for receipt, and to make it easier to track the receiving record of each box, you need to print the Carton Mark and have it placed on the outer /inside the box after the Inbound Order has been submitted to the warehouse.
Steps: Inbound >Awaiting > Select view drop down> Print Carton Mark

- View the OMS Inbound Order
- Draft – an unsubmitted OMS Inbound order. An unsubmitted OMS Inbound order in this state can be edited again and has not been included in the inventory.
- Awaiting – the inbound order that has been submitted to the warehouse and is waiting for the warehouse to process. The quantity is included in the “inbounding” data in the inventory.
- To be Received – the warehouse has confirmed the inbound quantity but has not put way the products to location.
- Completed – The inbound has been completed and the items have been put on the shelf.
- Canceled – Cancelled inbound orders. This includes all canceled records in history.

Product delivery mainly includes small package delivery orders (one – piece delivery) and bulk delivery orders.
1,Small Package Delivery Declaration
One-piece delivery is a small package delivery operation. There are three ways to place orders: store orders, create a single delivery order, and batch import delivery orders;
1.1 Store Orders
Both the OMS client and the WMS warehouse can be linked to the store. After linking, the online store order information can be sent to the “Order Management” interface to place an order;
Settings> Selling channel> Link store or market> Click the corresponding store and follow the instructions to link.
Steps: Click the double arrow button in the upper right corner> “Sync all stores” to synchronize the orders of all stores to the “Order Management” interface.
Click the rotating arrow button next to a single store to synchronize a single store order> tick the order, click “outgoing”> create outgoing order> select “warehouse name”, choose logistics services as needed (if you need warehouse to generate waybill, select Selected by warehouse, if you upload the waybill by yourself, select Upload Shipping Label, if you don’t need logistics service, select No Shipping Service Request)> “Apply”> create outbound order. After the outbound order is submitted successfully, it will be generated in the “Outbound order result” column The outbound order number, and the outbound order will directly enter the warehouse management-outbound-pending outbound interface;
Note: The store SKU pulled by the store must be associated with the corresponding OMSKU in the “Product” module in advance: Product-Edit-Add Alias-Fill in the corresponding store SKU and select the store name;

1.2 Create a Single Outbound Order
Steps: Outbound interface> Parcel Outbound Orders> Create Outbound order> Fill in the relevant information as required on the page, with a red * as required. Select the transportation service. You can check additional transportation services (such as signature service, insurance, Cash on delivery) and other value-added services, other information can be noted in the Note section>Save>Check the outgoing list in the draft interface>Submit the outbound order;
Note:
1)Selected by warehouse – The shipping service will automatically match the rules setted by the warehouse in advance; Upload Shipping Label – Print the shipping label from other platforms and upload here; No Shipping Service Request – no logistics service required; or warehouse self-service.
2) To add “Items to ship”, you need to click Add Item, enter SKU to query SKU inventory and fill in the quantity. Repeat the steps if there are multiple SKUs in a single package
3) “Shipment Quantity” should not be greater than “Available Quantity”.

1.3 Batch Import Outbound Orders
When there are multiple outbound orders, you can import outbound orders in batches by uploading a spreadsheet.
Steps: Outbound> Import> Import Outbound Orders> Select Warehouse> Download template> Fill in the information (Red headings means required> Upload > Once saved, it will be direct to Draft on Outbound >Submit.

2,Freight Outbound Orders Declaration
Freight outbound are usually sent by courier or other non-express delivery methods. This includes FBA and general bulk goods from the warehouse.
Bulk products out of the warehouse can only be submitted by creating a single outbound order.
2.1 Create a Freight Outbound order
Outbound> Freight Outbound Orders> Create Outbound Order > Fill in or select relevant information (* means required)> Fill in the delivery address> Add shipping products.
Keyword search SKU-query inventory-fill in and click Add Item to add a product. If you need to add multiple SKUs, follow this step again>Select additional services as needed>Save


2.2 Outbound Order Management
1) Export outbound list – click “Export” to export the list of outbound list
2) Hiding and displaying of fields – click on the page-like icon on the right to display or hide the fields as needed by “dragging”
3) Outbound list screening – click on the funnel-shaped icon on the right to quickly find outbound lists

In the “Inventory” module, you can click “Stock/Crossdock” to view the overall SKU inventory, and click on a different warehouse to view the inventory of the product in different warehouses. Inventory data includes actual standard products, actual damage, available inventory, inbound and outbound data;
By going to “Change logs” for either Stock or Crossdock, you can view the change records of each inventory data

Filter the view – You can choose to show or hide the fields by “dragging” as needed.

If the customer arranges to return the goods to the warehouse for processing or management, they need to submit a return order to the warehouse.
In the return list, you can view the return orders in all states, and you can search by return order number, shipping order number or RMA number.

- Create a Return Order
1.1 Manually Create a Return Order
Return> Create a return order> Fill in necessary information (* means required> Add product and quantity>Select processing method> Check additional services as needed> Submit
Note:
1) RMA No – It is the batch number of the returned goods, which the customer needs to fill in.
2) Tracking number – Return cargo tracking number. If there are multiple tracking numbers, separate them with commas.
3) When the processing method is “Replace Label”, upload the new SKU label through the attachment.
Other oOperation method (common methods are: Repair, Destroy, Add to Stock, etc.)> If there is additional processing demand, check the corresponding additional fee> Submit
Note: For multi-package returns, multiple packages can be added.

Operation steps: return> upload> select warehouse> download system template or upload your own file> upload and map file


2,Manage Return Orders
OMS can view the progress of each order the return order list;;
Return orders can be searched by filtering multiple numbers;
Submitted (unreceived) – Can view, edit, and cancel
Received – Can be processed and viewed

If the user has additional operational requirements for goods in the warehouse, he may submit a request for a work order to the warehouse, which may be carried out with the consent of the warehouse;
1,Submit a Work Order
The type of ticket configured by the WMS user can be selected after the specific warehouse has been selected, or the general type of ticket can be selected. The warehouse accepts the instructions to begin the process after the submission, and the progress goes to the suitable status page. When the ticket is completed, the fees on the ticket will be charged according to the content of the fees.

The OMS interface allows users to view the transaction details of each order. The page supports system number search, transaction time and warehouse filtering. You can see the amount of the fee, the balance of the account, the type of bill and the details of the bill.
1,How to view Transaction Details
Log in to your account->Billing and Funds->Enter the system order number to search> Click to view the bill details to view the bill details of the corresponding order
Click Transaction# to view the billing item details

2,How to View the Bill


Log in to your account->Billing and Funds->My Warehouse -> Recharge Key drop-down box to select the corresponding warehouse -> Choose either online or offline for payment options-> Fill in the information according to the transfer method and click Submit.


After the recharge request is submitted, you can check the recharge status under Warehouse Billing> Balance Change records

We support customers to connect Amazon, eBay, Shopify, ShipStation and other online e-commerce platforms to import orders in batches for order management operations.
Settings -> Selling Channels-> Connect to an online store or platform -> Select the corresponding e-commerce platform -> Follow the steps to connect.


After linking to the store of the e-commerce platform, you can directly place the order in the order management interface, no need to manually create the outbound order: order management> pull order> select store> process, then the order will enter the draft interface of outbound management; On the order management page, you can check the batch processing of orders in batches, or delete orders in batches.

Settings->Address Book->Add New Address->Select Sender/Recipient->Fill in the Corresponding Information->Save
After saving successfully, you can edit or delete the address. You may also copy and paste this in the address book
Click verify, the address will be filled in automatically and verified whether it is a business address or a residential address.

