ShipOut’s Getting Started Guide for New Users
ShipOut’s Getting Started Guide for New Users
New users? Please refer to the steps below to get started efficiently!

Step 1. Sign in to your account and set up your account basic information
We will provide the user login path and account information, according to which the customer can log in to the account to set up basic information.
Note: If you prefer the Chinese interface, you can set the language to CN in the upper right corner;
Step 2. Create a new warehouse
Sign in to the account number; create a new warehouse; fill in the warehouse information> select warehouse nature>select warehouse business features.
2.1. New warehouse
Fill in the warehouse name, address information, contact phone number after clicking “next step”;
Attention:
1) Subsequently, the warehouse information can be modified as needed in the future;
2) The time zone selected when the warehouse was created cannot be changed again;

2.2 Select the nature of the warehouse
- Private Storage Warehouse Private Warehouse: Self-Shipping Warehouse;
- Public (3PL) Storage Warehouse third party Warehouse: typically the business type is one-piece issue, transshipment, re-labeling, etc.;
- Private Distribution Warehouse Center’s own distribution warehouse
- Public (3PL) Distribution Warehouse Center’s third party warehouse distribution center
- Drop-ship Warehouse
- Other Business Model: other warehouse business models

2.3 Select the warehouse business function
Warehouse functions according to the use of the warehouse selection, the general warehouse has products, inventory management and other functions.
- Employee Management: Add employee accounts, configure employee roles, and corresponding functional modules
- Parcel Outbound: Small packages are mostly sent to individual users’ warehouses for sale on e-commerce platforms
- Freight Outbound: Large shipments are mostly large non-express shipments
- Shipping Carrier Integration: This feature can link your UPS, FedEx, Stamps, or EzeeShip account APIs
- Work Orders: For third party warehouses, for operational requirements for library products
- Smart Billing: For third-party warehouse, smart billing, support to set billing rules and additional service charges to O-side users
- 3PL client management: suitable for third party warehouse, inviting OMS users to participate in products, storage and library and other independent operations
- Return (RMA): Regarding return handling, including FBA returns and small package returns
- Material Management: Packaging materials management. When packaging, you can choose preset package material, package material billing.
Note: The business functions can then be modified to meet warehouse requirements: Settings and System App Settings and Reallocation Functions.

Step3. Create a product
3.1 Create a new product manually
WMS product additions. The product page can create:
- Individual products – containing only one product.
- Combined/Bundled product – composed of multiple standalone products.
- Once you are logged in your account, click New on the corresponding page.
3.1.1 Create a single product
Steps: Product> Create Product drop down> Create Standalone Product> Choose the warehouse to be submitted to> Fill in the product details
(* means required) (SKU can not be modified again.
Note:
1) Amazon store product :FNSKU, ASIN code should be filled in for follow-up return receipt management
2) The size and weight of the product must be filled in correctly, as it will affect the follow-up shipping, storage costs, etc.
3) If the product is an Online store ‘sales’, the alias must be associated to the Online store platform .

3.1.2 Create a Bundled product
Step: Product> Create Product drop down> Create Bundle Product> Choose the warehouse to be submitted to> Fill in necessary information (* means required) (SKU, name, product size weight is required)> Under ‘Bundle’ option, add the items from a Standalone Product> Submit.
Note:
1) A Combined product consisting of multiple products from a single SKU or multiple SKUs (e.g. skin care kits) the items of the combined products must already exist in the system.
2) Create a standalone product before creating a bundled product. “Automation Inventory Conversion” needs to be activated if you need to convert inventory from the single SKU products.
3) In the product information, “Consisting of Bundle” click to add the corresponding individual products

3.2 Import Products in Bulk
If you want to add more than one product, we recommend that you use the bulk import feature.
If you need to integrate SKU aliases on store platforms, you can choose to use the Import selling channel alias function. Efficiently match the SKUs of each platform to facilitate inventory management.
Step: Product> Import > Import Standalone product> Select warehouse> Download form template> Fill in form> Select filled form> Upload> Confirm information> Import.


Note:
1. Please leave the header unchanged for downloaded Excel templates.
2. The Red heading means required, and other necessary information should be provided as needed.
3. Once completed, click “Choose a file” to select the completed form
4. Upload the form.
5. Before “Importing” you may view the imported information on the confirmation page.
- Valid line, to be imported updating existing data- refers to products that update existing data
- Valid line, to be imported new records – Import new product records
- Invalid line, data name invalid or missing- invalid column, product name missing or invalid
- Invalid line, field mapping error- Invalid column, inconsistent product size or weight units
- Invalid line, duplicate data name specified- invalid column, duplicate recorded data. SKU uniqueness.

3.3. Review OMS customer products (optional)
OMS customers can create or import products and then submit them for review to the WMS system, and the product information in the product tab can be reviewed and approved.


Step 4. Logistics account management and configuration of freight service rules
Warehouses with billing requirements can be configured with shipping accounts and shipping service rules. The platform supports ordering shipments to UPS, FedEx, Stamps and EzeeShip accounts.
4.1 Configure the carrier’s account number
Steps: Setting> Shipping Account> Add account> fill in the API KEY generated in Account Name, Carrier, and carrier account> Save.
API Keys for UPS, FedEx, Stamps can be obtained by contacting the carrier. EzeeShip’s API Key can log in to EzeeShip Account Settings > API Settting to generate an API Key. Copy and paste it and click save to automatically complete the docking and start ordering.


4.2 Configure freight service billing rules
First go to Setting> Shipping Service Setting>Service Setting>Manage Shipping Service> Service Selection to activate the service as needed.
After activation, this service will become an option for future shipping services. 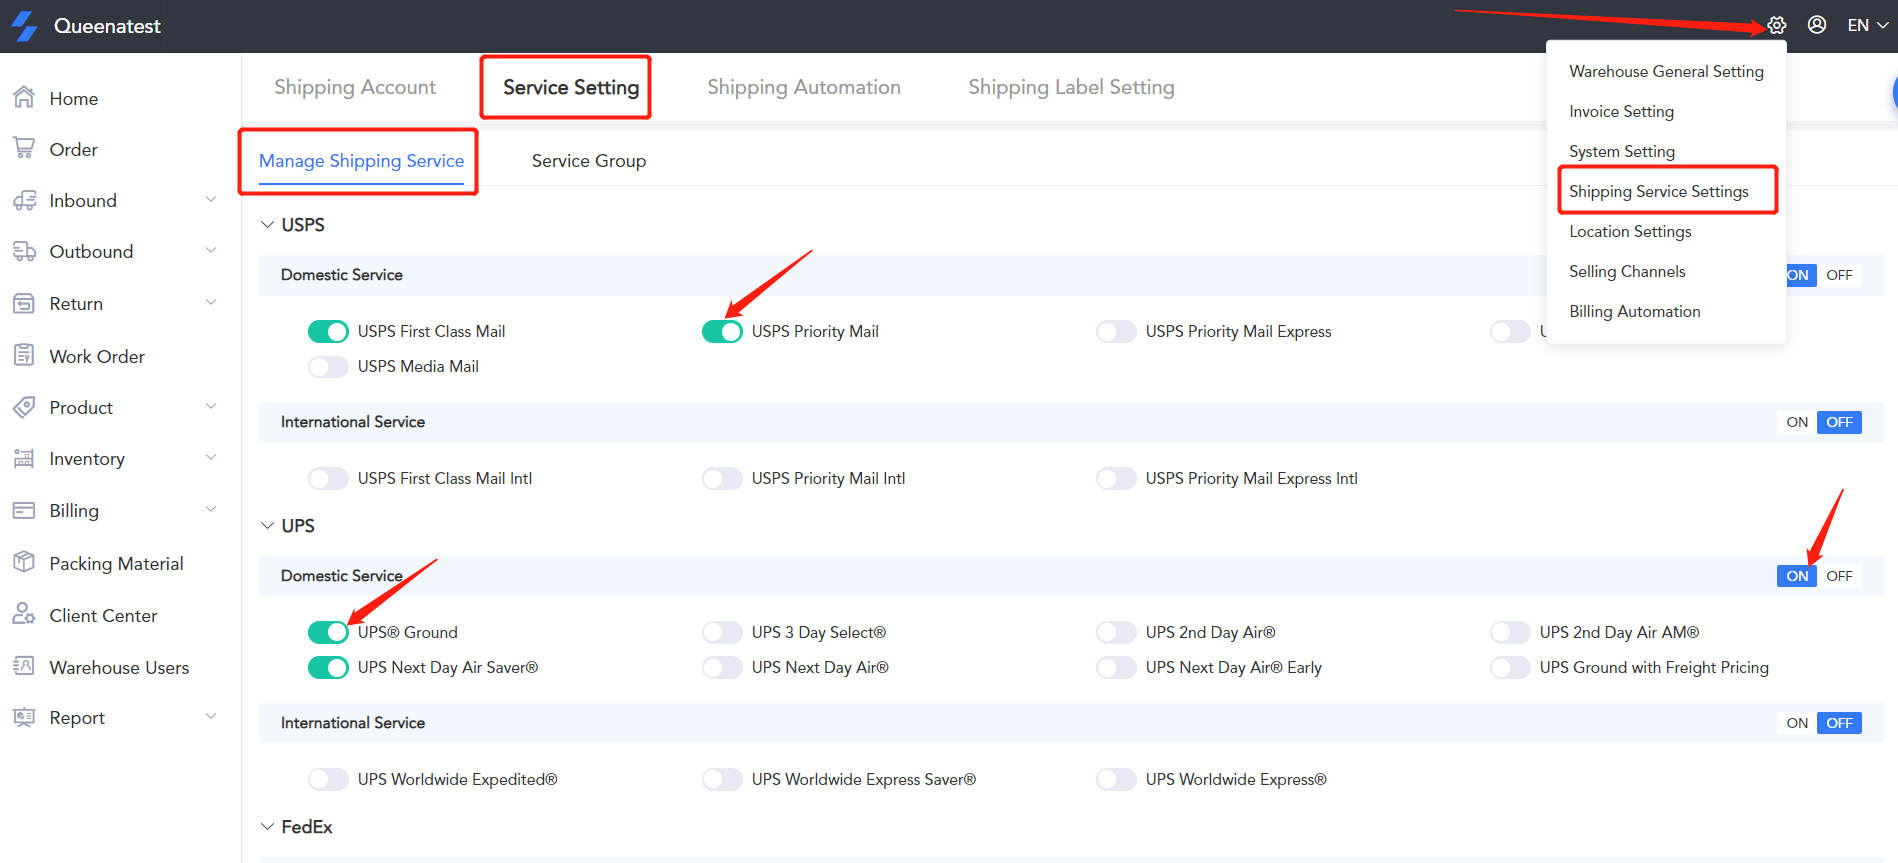
Click Setting> Shipping Service Setting> Shipping Automation to set shipping service rules for each account. You can choose different prerequisites such as product size, weight, additional services, countries, etc. to set up different accounts and different services to make orders.
For example: If the condition is that the delivery address is residential, the package size is greater than 6*4*1inch, and the weight is less than 10lbs, use FedEx SmartPost service, when 10-70lbs, use FedEx Home Delivery service, and in other cases use FedEx Ground service. If there is an order that does not apply to any of the services you configure, it will automatically use the default service you set at the bottom.

By Clicking on Setting> Shipping Service Setting> Shipping Label Setting, you can set the size of the label printing, select the required reference information, and print it with the label.

Step 5. Add warehouse areas and locations
Steps: Click Settings > Location Settings to create a area (create new) and create a location. Or import in bulk by clicking on “Import”.
5.1 Warehouse area settings
ShipOut’s ‘Area’ represents a specific area in the warehouse. Allows users to customize their names based on the operational capabilities of different areas of their warehouse. Set that a specific function module has permission to use this area location. Users can define zone names based on business models. Such as picking area, return area, storage area, receiving area, etc.


5.2 Location settings
ShipOut ‘Location Settings’ represents the inventory storage location. It can be a shelf number, pallet location, closet, warehouse sub-area, retail location, or virtual business operation (such as RMA or return or damage). A location is a storage location that can represent a small area of an entire building or building or business process.
- The location name must be associated with the warehouse area.
- Location names must be unique in all locations. Warehouse areas and sub-locations cannot have the same name.
Set the location name and the priority of picking. Once a new location has been created, you can see it under this area, and subsequent out-of-stock programs can be located to the appropriate location for picking.

Step 6. Custom app function module (optional)
This step is optional. You can also skip this for the next step. Users can turn on products, inventory, stocking, out-of-stock, ticketing, customer centers, and employee management functions on demand. For example, the ticket function needs to be configured for a third party warehouse. Click on the settings icon, System Settings, Preference Settings.
Note: The following function modules are controlled by the warehouse business module. If the business module is not selected, the relevant application function module will not be displayed.
Product Preference:
- Approval new products created by client- when opened, the products added on the OMS side are automatically approved.

Inbound Preference
Manage Inbound for your client- The WMS side can directly create or edit the deletion of OMS customer inbound orders.

Work Order Settings:
Customize your work order type: Custom ticket type. This function also requires the third-party warehouse to set up different work order categories and charge for its customers. Support users to set their own work order types and create billing rules for them.

How to create a new work order category:
Steps: Create work order>Create work order name>Select the options that will be affected by the work order operation

After creating a work order, an optional work order category will be added on the OMS end.

Step 7. Invite client and manage OMS centers (optional)
This function is mainly aimed at the third-party warehouses needs to invite their own users, support OMS users to participate in product addition, submission, and inventory operations.
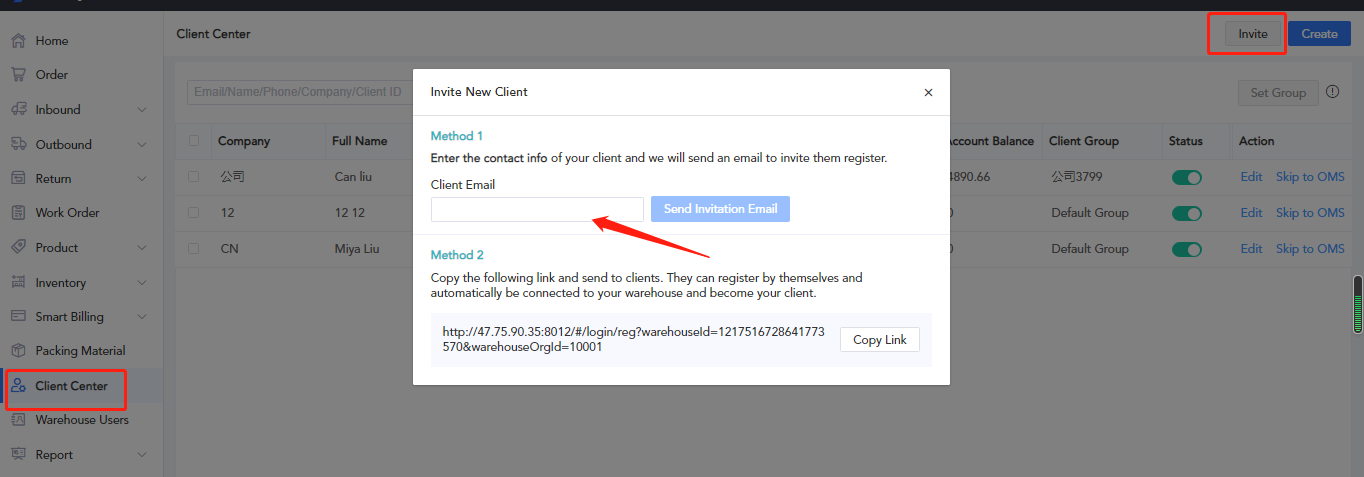
7.1 How to invite OMS users
- First way: by invitation.
- Enter the customer’s email directly by clicking send a notification email.
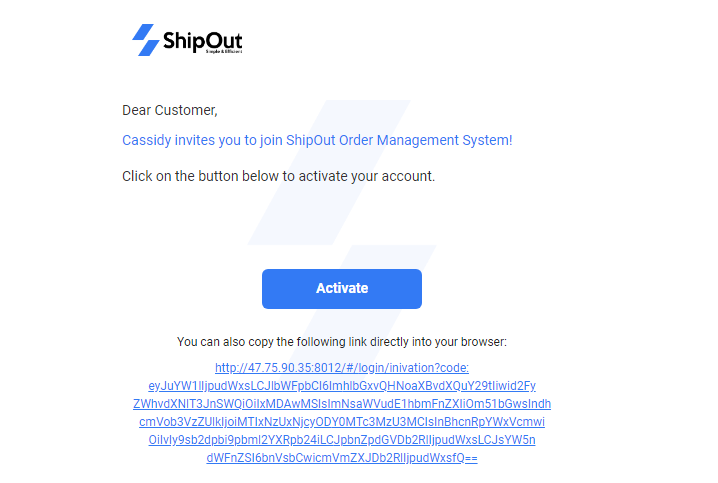
- Customers will receive the following email
- Click activate the customer can go to the information settings page, complete the information to create an OMS account. At the same time, we can also directly share the registration link to customers, customers click on the link can fill in the account information to complete the registration.
· 

The second method is to click Create> Fill in the customer information> and Save. This allows the customer to receive an email containing the password for the account. Customers are encouraged to change their passwords once they have an Official account.


7.2 Customer management
Basic customer information management – Client Center supports freezing OMS accounts, grouping customers (conveniently setting different billing rules for different grouped customers), setting credit limits for client, using the number of palles, and setting personalized billing rules for current customers by the relevant charge name at the customer details page point.


Step8. Linking e-commerce platform (optional)
Integrate Selling Channels, Store, or Marketplace. Select the online marketplace you need, enter the corresponding store ID, etc. ShipOut currently supports platforms such as Amazon, Ebay, Shopify, Walmart, Walmart DSV, Bigcommerce, Shipstation, Etsy, and WooCommerce. We are working to integrate more e-commerce platforms later.


Step9. Service and billing automation settings (optional)
This feature is primarily for third party warehouses, which can be skipped if it is a private warehouse or warehouse that does not require a business module. It supports the user’s configuration of billing rules for functional modules such as storage, shipping, inventory, returns and billing methods for value-added services.
9.1 Modules that support adding billing rules

Storage: receiving storage fees;
Outbound: picking fees, packing fees, shipping charges;
Returns: receiving fees, processing fees;
Inventory: You can set the billing rules of the system for automatic access;
Work Order: Refer to the work order type in the application settings to configure the charging rules. Supports the unit price of value-added services;
Additional service fee: The price is fixed, and the quantity is determined according to the actual business process. This can be achieved by setting up additional service fees.
9.2 How to add basic service charges
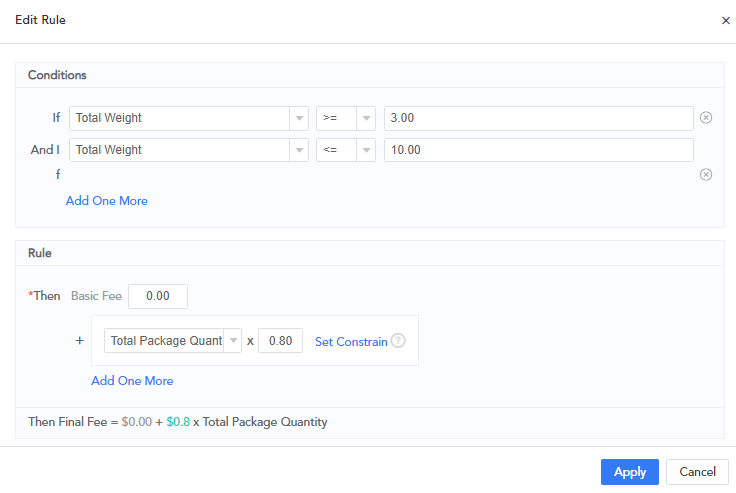
After you select the prerequisite, the configuration formula, the set amount, and then click Save, those who trigger this condition will automatically be charged to this billing rule. 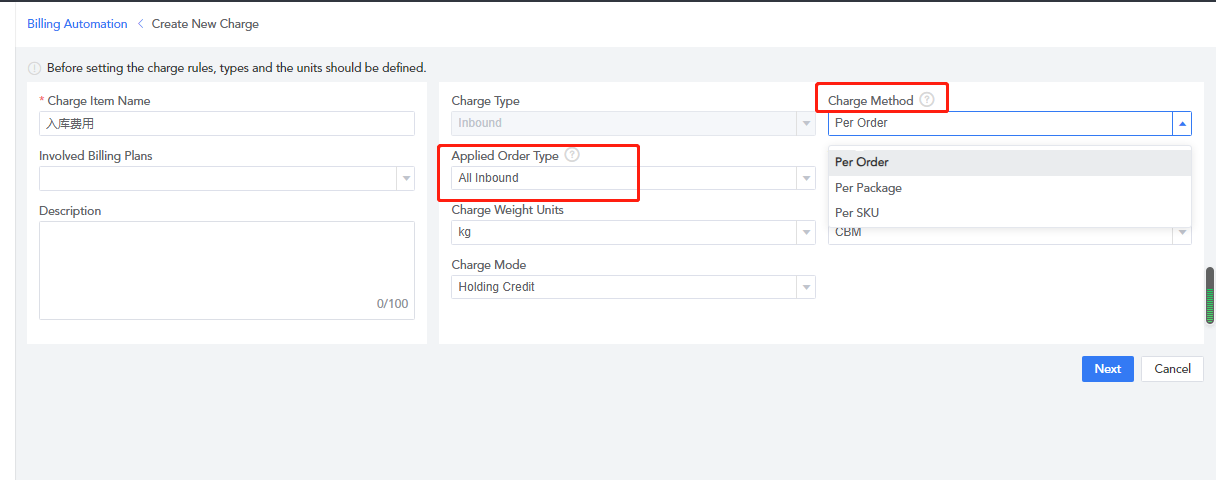
For example, you can configure the billing amount for the inbound receipt if the package’s weight is less than 3lbs, and the billing amount is 3lbs-10lbs. It will be automatically calculated and matched according to the billing rules you set once the warehouse confirms receipt and the item is ready to be put on the shelf. 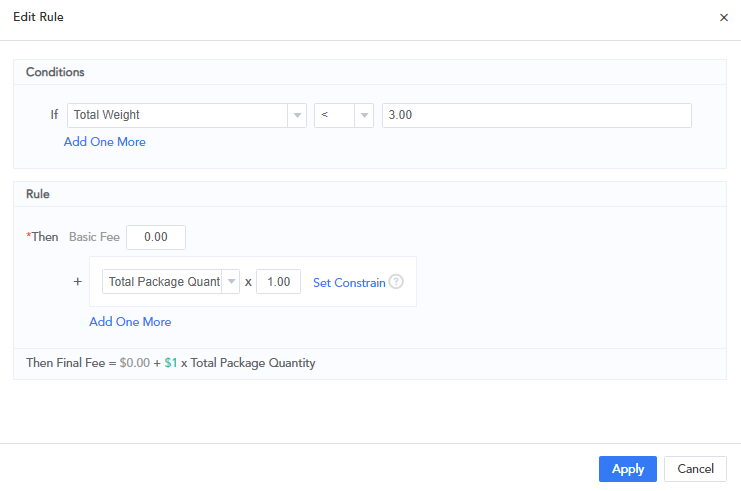

9.3 How to add Addition service fees
Billing automation> Additional services> Define the name and description of the value-added service you need> Select the unit> Set the price and save it. After adding, the Addition service options will be displayed in the Inbound, Outbound, and Return module.


Step 10. Packaging Material management
Packing material information can be configured in the Packing Material Module, including material code, cost price, selling price, volume and weight. Setting the section of packaging material can predict whether the packaging material is sufficient, which is convenient when placing orders to calculate volume and billing.
You can edit, delete or print the package material code after adding the packing material. In the Library Pack Link, if you need to select the package material, you can select the corresponding package material by scanning (manual selection is also currently supported)

Step 11. Configure the employee account
If you need multiple users to run your account, you can follow the steps to fill in the information and configure the employee to log in to the account. And configure the required role-based functional permissions. 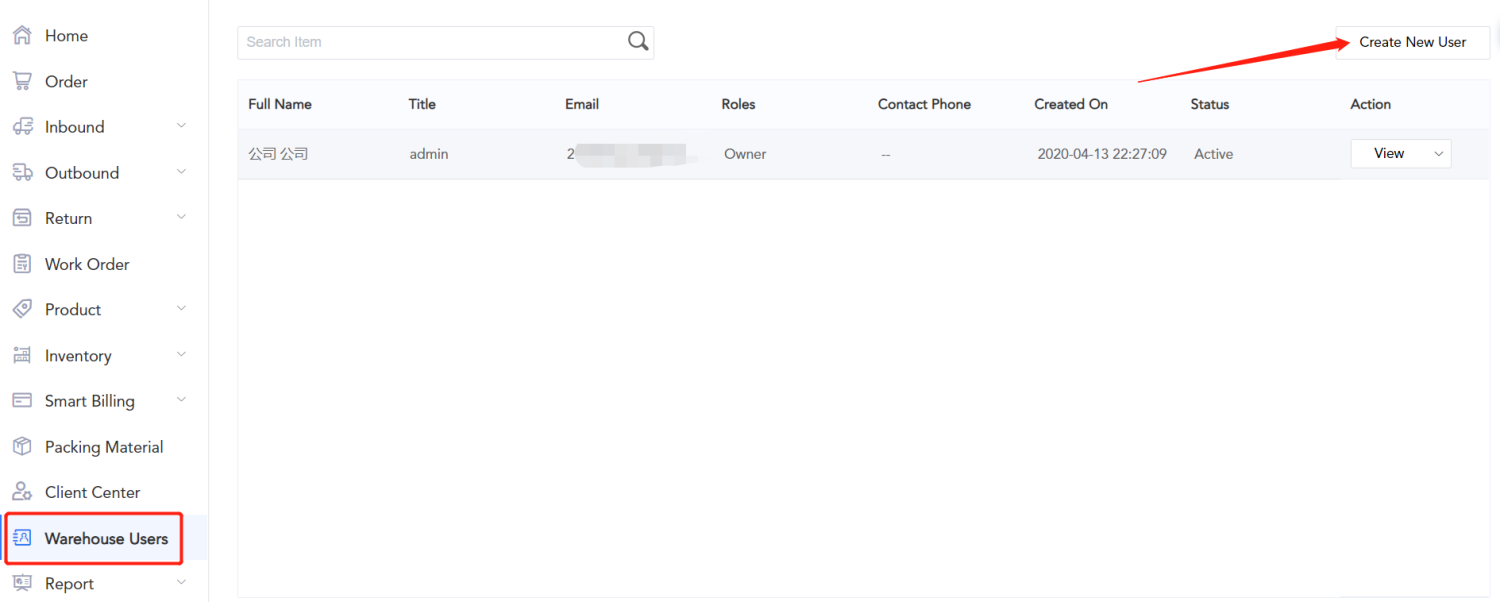

Step12. Inventory management
12.1 Inventory view
Warehouse inventory will be automatically updated with the update of the entry and exit records. You can view inventory through SKU, through location, and query inventory history.
View inventory through SKU: Inventory data is displayed on the basis of SKU, which is convenient for viewing the inventory number of each SKU in different locations;
View inventory through location: Inventory data is displayed based on location, which makes it easy to view the inventory number of different SKUs in each location;
Inventory history: view the inventory change records of each SKU;
note:
“Pick Cache” is the unfinished inventory data of this SKU in the picking process, and the inventory on this location cannot be manually modified or adjusted.
The “cut-off storage area” is the inventory data in the outbound order cancelled after the SKU is picked. The inventory on the location is only allowed to be transferred out, and other adjustments and operations cannot be performed.

12.2 Inventory management
12.2.1 Inventory synchronization
WMS inventory can be synchronized to Amazon, eBay, and Shopify temporarily. Check SKU-Inventory Synchronization-update selected inventory: inventory data will be synchronized to the store according to the latest data; check SKU-Inventory Synchronization-last update result: yes Download the inventory data sheet that was last updated to the store;

12.2.2 Inventory adjustment
Step: Inventory Change >select customer – product sku – position – type – change quantity – date – note;
Inventory adjustments are generally applied to:
- The actual inventory is not consistent with the system inventory after the inventory is manually counted;
- Inventory data that existed in the warehouse before the system was used and needs to be added manually:

12.2.3 Inventory Transfer
Transfer SKU from one location to another: Inventory Transfer -select customer-product SKU-original location-Inventory type-quantity to be move- Transfer Quantity – target location-date-notes

12.2.4 Import and export inventory
Import: Add new imported data to the original inventory data;
Bulk export inventory: export current inventory data. You can export selected SKU inventory or export all SKU inventory;

Recent Comments